


 Sign In
 Create Account
I'm just getting started on my SM build, I got a 90' Miata with a hardtop a couple weeks ago. This weekend I stripped the interior to get ready for the Miatacage I just ordered. I ended up finding more rust than I originally thought was on the car.
In the trunk where the battery sits, it is rusted through the metal and needs a patch panel. There is about a 4 inch square hole right under the battery and it has eaten into the rear quarter just a little right at the bottom corner where the rear bumper meets it.
I knew the drivers floor had a little rust, but when I got it all apart it was worse than I expected. I'm going to need a patch aprox. 8"x16" right behind the front seat mounting brace that runs across the floor pan. The rest looks to be just surface rust.
The pas. floor pan is fine and the rest of the car is pretty good with just some minor surface rust starting in a couple spots. I'm mainly concerned about those two areas where I need patch panels. I want to run SCCA and NASA events, what are the rules on rust repair and patch panels? I've seen "original tub" and a couple other comments, but nothing too specific on what is allowed.


Rust Repair- Floor Pan + Trunk?

Started by
David Johnson
, 08-07-2011 07:09 PM
#1

 Posted 08-07-2011 07:09 PM
David Johnson
-
- Members
-

- 7 posts
Junior Member
- Location:Central, FL
- Region:CFR
- Car Year:1990
- Car Number:133
 Back to top
 Report
#2
Posted 08-08-2011 07:42 AM
davew
-

- SMembers
-
- 2,297 posts
Veteran Member
- Location:Beloit, Wi
- Region:Chicago
- Car Year:1999
- Car Number:72
If it was me, I would now have a parts car and start looking for a better donor.
You will be fighting the rust problem the entire life of the car
Cut your losses and find a rust free car.
Dave
You will be fighting the rust problem the entire life of the car
Cut your losses and find a rust free car.
Dave
Dave Wheeler
Advanced Autosports, the nations most complete Spec Miata shop
Author, Spec Miata Constructors Guide, version 1 and 2.0
Building Championship winning cars since 1995
4 time Central Division Spec Miata Champion car builder 2012-2013-2014-2017
Back to Back June Sprints Spec Miata 1-2 finishes 2016 and 2017
5 time June Sprints winner in Mazda's
6 Time Northern Conference Champion Car Builder
2014 SCCA Majors National point Champion car builder
2014 SCCA Runoffs winner, T4 (Bender)
2014 Central Division Champion, ITS (Wheeler)
2013 Thunderhill 25 hour winning crew chief
2007 June Sprints winner, (GT1, Mohrhauser)
Over 200 race wins and counting.
www.advanced-autosports.com
dave@advanced-autosports.com
608-313-1230


#3
Posted 08-08-2011 02:16 PM
David Johnson
-
- Members
-
- 7 posts
Junior Member
- Location:Central, FL
- Region:CFR
- Car Year:1990
- Car Number:133
I looked at quite a few miatas before I bought this one and most of them were worse off than the one I picked up. The other areas of the body and frame are in really good shape besides the 2 spots mentioned above. It just looks like they had a top leaking on the dr. side and a leaking battery at some point in the cars life. I'm pretty confident I can repair these two problem areas and have a solid car. I just would like to know if I can patch them with sheet metal of aprox. the same thickness as original, or am I required to get oem sheet metal to replace it so It has the factory bends and contours of the floor and trunk?
#4
Posted 08-08-2011 04:17 PM
dstevens
-

- SMembers
-
- 1,404 posts
Veteran Member
- Location:Vegas
- Region:LVR
You can patch them, but make sure you don't cut too much out and maintain the original contour. My floor was pretty well trashed and normally I would have cut the whole thing out and replaced it but that's not legal. I used strips of 20 ga to patch it. Dave W is right, a rust free tub is the best way, I've spent a bunch of time on rust rather than replacing. I'm not in a position to get another donor. First, I can't store it. I've already got a stock car and trailer in storage and now that my wife is going back to school and not working I can't put the family on the hook another few grand for what is basically my toy. I've got a pretty well equipped fab shop, AC/DC TIG, MIG, stick, plasma cutting, tube bending and notching, pressing, punching, brake, English wheel, media blasting, paint, etc. The floor and cockpit rust was a good 10 hours once all was said and done. And easily twice that refurbing the suspension parts and under carriage. Details on on the blog but here is a pic of the floor before fixing. I thought I had one after the fix, I'll see if I can dig that up.

rot 1 by Dave Stevens, on Flickr
rot 1 by Dave Stevens, on Flickr
#5
Posted 08-08-2011 04:41 PM
dstevens
-
- SMembers
-
- 1,404 posts
Veteran Member
- Location:Vegas
- Region:LVR
Here's the cockpit prior to wire wheeling it. After the wire wheel much of the foot well was rusted through, both sides.
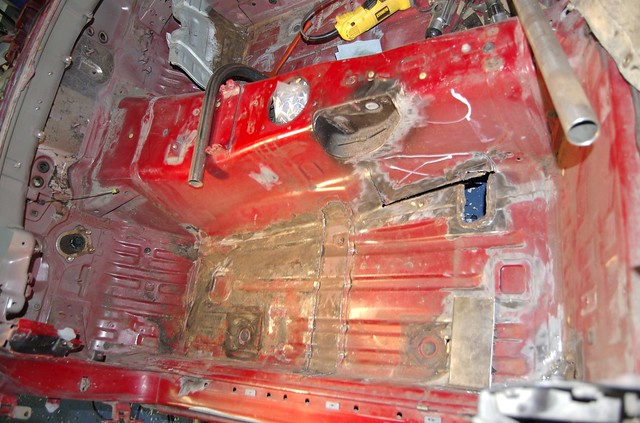
cockpit stripped by Dave Stevens, on Flickr
Here's one I just took of the fix of the rust in the last post. The floor is a bit tricky to weld. You should grind off the compound on the underside as a) it makes the arc wander and b ) it catches fire. Easily catches fire.... I tacked the strips in place then hammered a contour with a ball peen. After the fitting I did the finish welds then ground them flush with the floor pan.

floor pan fix 1 by Dave Stevens, on Flickr
cockpit stripped by Dave Stevens, on Flickr
Here's one I just took of the fix of the rust in the last post. The floor is a bit tricky to weld. You should grind off the compound on the underside as a) it makes the arc wander and b ) it catches fire. Easily catches fire....
I tacked the strips in place then hammered a contour with a ball peen. After the fitting I did the finish welds then ground them flush with the floor pan. floor pan fix 1 by Dave Stevens, on Flickr
#6
Posted 08-08-2011 08:46 PM
David Johnson
-
- Members
-
- 7 posts
Junior Member
- Location:Central, FL
- Region:CFR
- Car Year:1990
- Car Number:133
Thanks for the info and pics. My drivers floor is about as bad as yours was, but my pas. side is pretty solid, but then I have the trunk to repair too. The rest of the body, frame and suspension are fine. So I guess I'm in for about the same amount of work you did, maybe slightly less. Like you, I'd rather put in 10-15 hours into the repairs than to go find another car for much of the same reasons you mentioned. I also have a capable shop setup with all the tools needed. I'm currently looking into a couple parts cars to possibly cut the patch panels off, but I've got to see what shape they are in.
#7
Posted 08-10-2011 12:18 PM
Sphinx
-
- Members
-
- 651 posts
Veteran Member
- Location:Atlanta
- Region:ATL
Help me understand why you would want to build a '90 when they can be had pretty cheaply for an already built up rust free one? There's even a starter one on the classifieds page for less than $6k. I doubt you'd find any experienced racers building 1st gen cars. If you'e building one from the ground up, buy a '99 and build it up.
Resell the hardtop ($1000), strip the tub you have, and acquire an already built 1st gen. Remember, the tub is (or should be) the least expensive part of this project.
Resell the hardtop ($1000), strip the tub you have, and acquire an already built 1st gen. Remember, the tub is (or should be) the least expensive part of this project.
#8
Posted 08-10-2011 01:30 PM
dstevens
-
- SMembers
-
- 1,404 posts
Veteran Member
- Location:Vegas
- Region:LVR
That distressed autocross car looks like a screaming deal. If the wife was working I'd buy it, get a book for it and flip it. Most of the 6k starter cars I've seen are beaters. Bummer, looks like the guy is going to take a pretty big loss.
#9
Posted 08-10-2011 04:17 PM
David Johnson
-
- Members
-
- 7 posts
Junior Member
- Location:Central, FL
- Region:CFR
- Car Year:1990
- Car Number:133
I got a early model because I want the option to run SSM too at least as I'm starting out. I consider myself a good driver with some kart and a lot of drag racing and high powered street car experience, but I know it's going to be a lot different doing what I call "Real Racing". Even if a well built 99' is a couple tenths faster per lap than the 1.6, it's not going to make a bit of difference with me driving at least for a while anyways. I'm going to concentrate more on learning and improving my driving for a season or two first. My shop is very well equipped and I can do pretty much everything myself, and I'm also very particular about my cars and enjoy building them

0 user(s) are reading this topic
0 members, 0 guests, 0 anonymous users

