


 Sign In
 Create Account
Working on completion of my car with a fabricator that has never done a Miata cage. There seems to be a couple of design differences for location of the dashbar- either located just below the steering column fairly low to the transmission tunnel (which doesn't seem to interfere with the heaterbox) or 'high' behind the dash vents. I'd appreciate some options or opinions? It looks like the choice involves utilization, modification or deletion of the dash's structural crossmember.
Thanks- and Happy Easter


Dash Bar Location

Started by
Steve-O
, 04-21-2011 06:41 PM
#1

 Posted 04-21-2011 06:41 PM
Steve-O
-
- Members
-

- 19 posts
Member
- Location:Richmond, Va
- Car Year:1995
 Back to top
 Report
#2
Posted 04-21-2011 07:09 PM
Johnny D
-

- Moderators
-

- 6,121 posts
Veteran Member
- Location:Fremont, CA
- Region:San Francisco
- Car Year:1999
- Car Number:88
Don't you have to put it back in the orig location to put the dash and steering column in?
J~
J~
2011 NASA Western Endurance Racing Championship E3 Champ


#3
Posted 04-21-2011 07:49 PM
dstevens
-
- SMembers
-
- 1,404 posts
Veteran Member
- Location:Vegas
- Region:LVR
Put the dash frame in and design around that. Then cut the dash cover to fit. Tom Hampton has some good pics on his blog with an Advanced Autosports SM cage kit. You can find them on the blog section of this site. Some cage designs use an upper or "hidden" bar design, others use the low bar design. There are examples of both on the Web.
How far is your guy into it? If he's not started to cut or bend tubing you may want to get a kit and have him install it. From the sounds being that unfamiliar with the class if you guys aren't absolutely certain, at inspection time he might do something that prohibits getting the car a book, or gets a DQ later (for example with the dash structure).
How far is your guy into it? If he's not started to cut or bend tubing you may want to get a kit and have him install it. From the sounds being that unfamiliar with the class if you guys aren't absolutely certain, at inspection time he might do something that prohibits getting the car a book, or gets a DQ later (for example with the dash structure).
#4
Posted 04-21-2011 11:40 PM
Tom Hampton
-

- SMembers
-
- 2,060 posts
Egregious Member
- Location:Mckinney, tx
- Region:South west
- Car Year:1992
- Car Number:41
Dave beat me to my own punch! See the link in my signature.
I like the low design better, because of the smaller moment arm between the door bar and the knee bar. It does not interfere with the driving position at all.
I highly recommend the kit approach with a proven design. If you get the same kit i have, I'll take any measurements you need. Pm me for that.
-tch
Build: www.tomhampton.info
video: vimeo.com/tomhampton
Support: X-Factor Racing
I didn't lose, I just got outspent!
#5
Posted 04-22-2011 01:57 PM
Gunpilot
-

- Members
-
- 53 posts
Member
- Location:Houston / Pearland, TX
- Car Year:1992
- Car Number:88
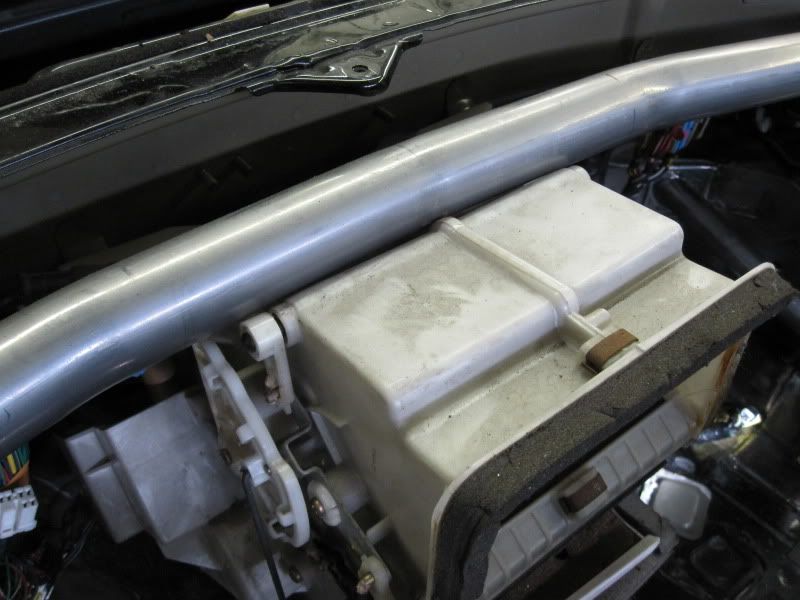
Riding right along the main blower vents (that had to be cut) worked great for refitment of the dash and outer plastic defrost vents.

#6
Posted 04-26-2011 06:22 PM
w650gb500
-
- Members
-
- 1 posts
Junior Member
- Location:Pennsylvania
- Region:NEPA
I do all of mine behind the heater core and it doesn't require cutting it, just some trimming of the metal dash frame. This way makes it easy to remove and replace the heater core down the road if/when it decides to leak.

Dan Lipperini Jr
www.RaceLabz.com
www.RaceLabz.com
#7
Posted 04-27-2011 08:33 AM
davew
-

- SMembers
-
- 2,297 posts
Veteran Member
- Location:Beloit, Wi
- Region:Chicago
- Car Year:1999
- Car Number:72
I don't want to turn this into a peaing match. But I have some minor issues with both the gray cage and the yellow cage above.
On the gray cage, how do you install the defroster ducts? We do run in the rain, after all.
The main purpose of the dash bar is to keep the cage from collapsing into the driver compartment in the event of a "T-Bone" type crash. If this happens, the force of impact is taken by the door bars and is applied to the front down tube. That force is then applied to the dash bar, then accross the car. Thus creating a "crush prrof" zone for the driver. In both cages above, the dash bar is 8-10 inches above the point where the door bar joins the front down tube. This creates a colapse point for the cage. Curving the dash bar also adds potential bend points.
The same theroy can be applied to where the "harness" bar joins with the main hoop. This is only visable in the yellow cage photos.
I will readily admit, that I am talking about worst case scenario crashes here. I am sure that both of these designs would work perfectly well in 99% of the incedents that we see. I would feel safe driving either of the cars, so do not jump on me too bad.
Dave
Dave Wheeler
Advanced Autosports, the nations most complete Spec Miata shop
Author, Spec Miata Constructors Guide, version 1 and 2.0
Building Championship winning cars since 1995
4 time Central Division Spec Miata Champion car builder 2012-2013-2014-2017
Back to Back June Sprints Spec Miata 1-2 finishes 2016 and 2017
5 time June Sprints winner in Mazda's
6 Time Northern Conference Champion Car Builder
2014 SCCA Majors National point Champion car builder
2014 SCCA Runoffs winner, T4 (Bender)
2014 Central Division Champion, ITS (Wheeler)
2013 Thunderhill 25 hour winning crew chief
2007 June Sprints winner, (GT1, Mohrhauser)
Over 200 race wins and counting.
www.advanced-autosports.com
dave@advanced-autosports.com
608-313-1230

#8
Posted 04-27-2011 08:53 AM
wheel
-
- Members
-
- 800 posts
Veteran Member
- Location:Kansas City
- Region:KC
- Car Year:1992
- Car Number:20
#9
Posted 04-27-2011 09:40 AM
Tom Hampton
-
- SMembers
-
- 2,060 posts
Egregious Member
- Location:Mckinney, tx
- Region:South west
- Car Year:1992
- Car Number:41
The main purpose of the dash bar is to keep the cage from collapsing into the driver compartment in the event of a "T-Bone" type crash. If this happens, the force of impact is taken by the door bars and is applied to the front down tube. That force is then applied to the dash bar, then accross the car. Thus creating a "crush prrof" zone for the driver. In both cages above, the dash bar is 8-10 inches above the point where the door bar joins the front down tube. This creates a colapse point for the cage. Curving the dash bar also adds potential bend points.
The same theroy can be applied to where the "harness" bar joins with the main hoop. This is only visable in the yellow cage photos.
+1 That's why I bought the cage I did.
-tch
Build: www.tomhampton.info
video: vimeo.com/tomhampton
Support: X-Factor Racing
I didn't lose, I just got outspent!
#10
Posted 04-27-2011 10:36 AM
Jason J Ball
-

- Members
-
- 170 posts
Member
- Location:Clayton, NC
- Region:NASA-SE
- Car Year:1990
- Car Number:15
The tubing is strongest in the axial direction. So ideally, you want your tubes to connect across the vertical bars so that they transmit the forces axially along the frame members. For the dash bar in particular, you want to have the bar connect to the front down tube at the same point as your top door bar. I can attest to the strength of Dave's design as I tested it in a T-Bone scenario at about 70 MPH, +3G's on my Traqmate. I now have the same cage fit into my new car.
#11
Posted 04-27-2011 10:42 AM
wheel
-
- Members
-
- 800 posts
Veteran Member
- Location:Kansas City
- Region:KC
- Car Year:1992
- Car Number:20
#12
Posted 04-27-2011 11:51 AM
Jason J Ball
-
- Members
-
- 170 posts
Member
- Location:Clayton, NC
- Region:NASA-SE
- Car Year:1990
- Car Number:15
It didn't feel so soft.  Maybe that's the the upper limit on what the Traqmate can measure.
Maybe that's the the upper limit on what the Traqmate can measure.
#13
Posted 04-27-2011 12:21 PM
wheel
-
- Members
-
- 800 posts
Veteran Member
- Location:Kansas City
- Region:KC
- Car Year:1992
- Car Number:20
That may well be the case. I think F1 cars generate 4+ in cornering and more than that in braking. A friend hit the wall at RA and hit 12 Gs. I've done 6+ in an airplane before my vision started to get funky... tunnel vision.
wheel
wheel

1 user(s) are reading this topic
0 members, 1 guests, 0 anonymous users

