Sign In
 Create Account


Final Welding
Posted by
Adax
,
06-23-2013
·
3,189 views
With the tray into place, the remaining cage can be tacked and welded into place an I can finally get the car off to paint. It's pretty straightforward as I had already cut and fit the pieces before the tray went in. Lets hope they still fit.
Tacked into place:

Final welds:

Unfortunately I have to again flip the car over to finish the welding. It's not all that hard with the rotisserie but I have to remove the sub-frames to flip it which takes a bit of effort.

Now the final back-side welds can be completed. This view is from inside the inverted car looking at the underside of the main hoop.

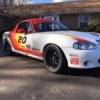
I'll try to be modest but I really like the looks of this now that it is finished. I seriously debated leaving the tray unpainted but decided to paint it white like the rest of the cage.


It's now at the painter's. I stopped by OPM on the way to fish for some compliments and Ryan was kind enough to point out two areas that I forgot to weld. Fortunately I was able to weld it at the shop but it was windy and they are pretty ugly.
Tacked into place:
Final welds:
Unfortunately I have to again flip the car over to finish the welding. It's not all that hard with the rotisserie but I have to remove the sub-frames to flip it which takes a bit of effort.
Now the final back-side welds can be completed. This view is from inside the inverted car looking at the underside of the main hoop.
I'll try to be modest but I really like the looks of this now that it is finished. I seriously debated leaving the tray unpainted but decided to paint it white like the rest of the cage.
It's now at the painter's. I stopped by OPM on the way to fish for some compliments and Ryan was kind enough to point out two areas that I forgot to weld. Fortunately I was able to weld it at the shop but it was windy and they are pretty ugly.