Jump to content

Photo

Is my diff repairable?

- - - - -

  • Please log in to reply
21 replies to this topic

#1
Scott Krzastek

Scott Krzastek

    Member

  • Members
  • PipPipPip
  • 24 posts
  • Location:Waynesboro, VA
  • Region:NASA-MA / BRR-SCCA
  • Car Year:1992
  • Car Number:91

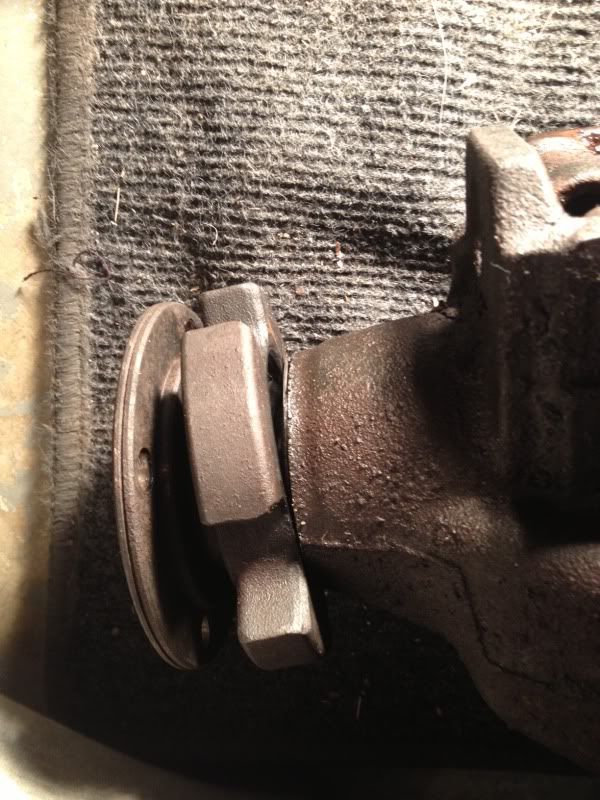
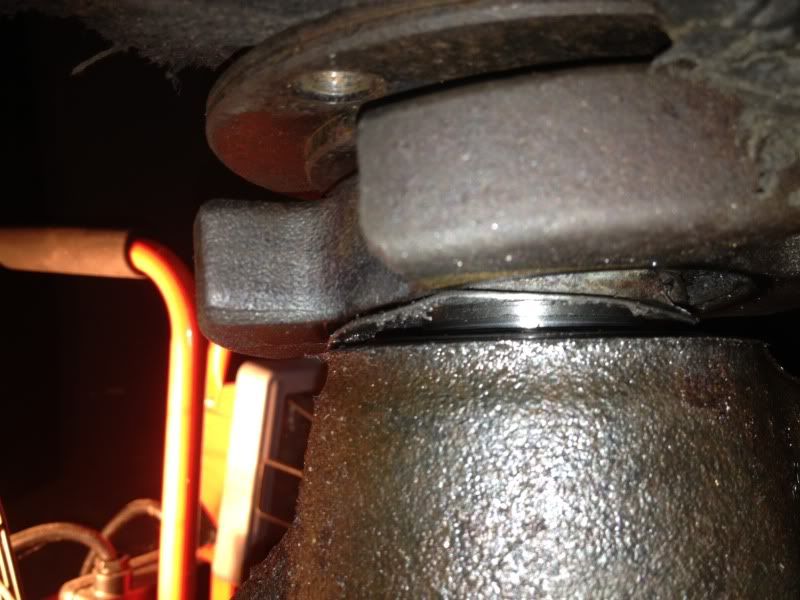
During my last race I started getting a vibration that got worse thoughout the session.  When I got back to the paddock there was diff fluid all over the rear of the car.  It looks like it came from the nose of the diff.  I'm thinking the pinion damper broke or maybe lost a seal?  There is still fluid in the diff so I didn't loose all of it.  Is it repairable, or am I better off finding another?


1385935339.jpg

1385935375.jpg


#2
HoneyBadger - BrianW

HoneyBadger - BrianW

    Member

  • Members
  • PipPipPip
  • 416 posts
  • Location:Dallas, TX
  • Region:Southwest
  • Car Year:1999
  • Car Number:59

Assuming the dampener didn't damage any of the bearings inside the diff it is most likely repairable. This is a very common failure of our cars. It is now legal to remove the dampener. I had this happen to my diff and I removed the dampener, replaced the seal and re-installed and everything was fine. You will need to set the lash and replace the crush washer when you remove the dampener.


Make it Rain - Made Paypal donation of $100+ Bona fide - A bonafide Spec Miata driver

#3
SaulSpeedwell

SaulSpeedwell

    Veteran Member

  • Members
  • PipPipPipPipPip
  • 792 posts
  • Location:NEOhio

Repairable.  Reputable SM diff guy can repair and prevent future recurrence***.


***You're on your own in the Tech Shed ....


For faster reply than PM:  miataboxes>>>AT<<<gmail>>DOT<<<com


#4
chris haldeman

chris haldeman

    Veteran Member

  • Members
  • PipPipPipPipPip
  • 928 posts
  • Location:Mckinney
  • Region:texas
  • Car Year:1999
  • Car Number:73
Update. As of December 2012 it was made legal too remove this trouble causing weight from the diff!! Myself and a customer of Dave wheelers had that weight ruin our runoffs. After that myself and Dave wheeler requested allowing removal and got it approved.
X-factorracing.com
3 podium finishes
2 2013 NASA nats
1 2013 Scca runoffs
Donor - Made PayPal donation Bona fide - A bonafide Spec Miata driver BFG Supertour Winner - Circuit of the Americas Winner - Majors Winner - Make it Rain - Made Paypal donation of $100+ We have a Winnah! - Won their 1st race... Congratulations!

#5
Mike Collins

Mike Collins

    Big Cheese

  • Moderators
  • 1,262 posts
  • Location:Summit Point Motorsports Park
  • Region:Washington DC
  • Car Number:75

The removal is allowed...as would be running the one from the automatic car that had no such damper.


Mike "MEATHEAD" Collins
Founder - Partner
MEATHEADRacing
240-476-1593

www.meatheadracing.com
Make it Rain - Made Paypal donation of $100+ Sponsor / Advertiser - Site sponsor / advertiser... support these guys! Bona fide - A bonafide Spec Miata driver Sugar Daddy - Made PayPal donation of $500+ Donor - Made PayPal donation Beta-Tester - Assisted us with beta testing the website. MX5 Cup Participant - Has Participated in a MX5Cup.com Series Event Instigator - Made a topic or post that inspired other

#6
davew

davew

    Veteran Member

  • SMembers
  • PipPipPipPipPip
  • 2,297 posts
  • Location:Beloit, Wi
  • Region:Chicago
  • Car Year:1999
  • Car Number:72

Since it was my letter that got the removal of this allowed, I will  expand.


They only seem to break at hi speed tracks that use 5th gear. I have experienced a rash of 5th gear failures following the damper breaking. My theory is that the drive shaft starts to whip and actually flexes the output shaft of the trans. SInce 5th gear is the rear most gear, it takes all the abuse and eventually says F-you and breaks.


You do not need to replace the crush sleeve or reset back lash. Before removing the big nut, make a mark showing where the pinion tip, nut and flange line up. I like to use a chisel to make a line going accross all 3 items. Remove the nut, remove the driveshaft flange. The majority of the damper ring will fall off. To get the inner portion off, a press and bearing race remover work perfect. I usually put in a new pinion seal while it is apart.


To reassemble, install the flange on the pinion while lining up the marks you made above. Tighten the nut slowly untill the 3 marks all line-up. You will now have the same bearing preload as before disassembly. I usually go an extra 1/8" tighter on the nut. Please remember the 3 marks will line up on every turn of the nut. One turn too loose is just as bad as one turn too tight.


I have used this method thousands of times in my 30+ years of fixing cars.. It works just fine for emergency trackside repairs or for in the shop permanant fixes.


We have made it a practice to remove the damper any time we have the driveshaft removed from the car. I carry flanges with the damper removed in my trailer as  spares.


The auto trans flange does not have the damper. It is the exact same piece, just without the damper. The auto trans part is not available from Mazda. Plus why spend $100 when you can remove the damper for nothing.


Dave


  • john mueller and Muda like this

Dave Wheeler
Advanced Autosports, the nations most complete Spec Miata shop
Author, Spec Miata Constructors Guide, version 1 and 2.0

Building Championship winning cars since 1995

4 time Central Division Spec Miata Champion car builder 2012-2013-2014-2017

Back to Back June Sprints Spec Miata 1-2 finishes 2016 and 2017

5 time June Sprints winner in Mazda's

6 Time Northern Conference Champion Car Builder

2014 SCCA Majors National point Champion car builder

2014 SCCA Runoffs winner, T4 (Bender)

2014 Central Division Champion, ITS (Wheeler)

2013 Thunderhill 25 hour winning crew chief

2007 June Sprints winner, (GT1, Mohrhauser)

Over 200 race wins and counting.
www.advanced-autosports.com
dave@advanced-autosports.com
608-313-1230
Survive the 25, NASA Thunderhill - Survive the 25, NASA Thunderhill We have a Winnah! - Won their 1st race... Congratulations! Sponsor / Advertiser - Site sponsor / advertiser... support these guys! Donor - Made PayPal donation Bona fide - A bonafide Spec Miata driver

#7
SaulSpeedwell

SaulSpeedwell

    Veteran Member

  • Members
  • PipPipPipPipPip
  • 792 posts
  • Location:NEOhio

Great post, Dave.


I've seen this failure with and without a correlated crush sleeve failure.  I agree with you that if there ISN'T a pinion preload problem, the "mark with chisel and reinstall" method is successful. 


We just need to make sure people don't think they can retorque a sloppy pinion (although I've done it temporarily when there was no other choice, with some success).


For faster reply than PM:  miataboxes>>>AT<<<gmail>>DOT<<<com


#8
Johnny D

Johnny D

    Veteran Member

  • Moderators
  • 6,121 posts
  • Location:Fremont, CA
  • Region:San Francisco
  • Car Year:1999
  • Car Number:88


SInce 5th gear is the rear most gear, it takes all the abuse and eventually says F-you and breaks.


Dave


Miata Diff Whisperer.

J~


2011 NASA Western Endurance Racing Championship E3 Champ
We have a Winnah! - Won their 1st race... Congratulations! Beta-Tester - Assisted us with beta testing the website. Donor - Made PayPal donation Bona fide - A bonafide Spec Miata driver Novel Approach - When a paragraph simply won't do... Survive the 25, NASA Thunderhill - Survive the 25, NASA Thunderhill Instigator - Made a topic or post that inspired other Make it Rain - Made Paypal donation of $100+

#9
FTodaro

FTodaro

    Veteran Member

  • SMembers
  • PipPipPipPipPip
  • 3,084 posts
  • Location:Columbus Ohio
  • Region:Great Lakes
  • Car Year:2001
  • Car Number:35

Since it was my letter that got the removal of this allowed, I will  expand.


They only seem to break at hi speed tracks that use 5th gear. I have experienced a rash of 5th gear failures following the damper breaking. My theory is that the drive shaft starts to whip and actually flexes the output shaft of the trans. SInce 5th gear is the rear most gear, it takes all the abuse and eventually says F-you and breaks.


You do not need to replace the crush sleeve or reset back lash. Before removing the big nut, make a mark showing where the pinion tip, nut and flange line up. I like to use a chisel to make a line going accross all 3 items. Remove the nut, remove the driveshaft flange. The majority of the damper ring will fall off. To get the inner portion off, a press and bearing race remover work perfect. I usually put in a new pinion seal while it is apart.


To reassemble, install the flange on the pinion while lining up the marks you made above. Tighten the nut slowly untill the 3 marks all line-up. You will now have the same bearing preload as before disassembly. I usually go an extra 1/8" tighter on the nut. Please remember the 3 marks will line up on every turn of the nut. One turn too loose is just as bad as one turn too tight.


I have used this method thousands of times in my 30+ years of fixing cars.. It works just fine for emergency trackside repairs or for in the shop permanant fixes.


We have made it a practice to remove the damper any time we have the driveshaft removed from the car. I carry flanges with the damper removed in my trailer as  spares.


The auto trans flange does not have the damper. It is the exact same piece, just without the damper. The auto trans part is not available from Mazda. Plus why spend $100 when you can remove the damper for nothing.


Dave

Dave could you  post a picture or two.


I have seen lots of 3rd gear failures but no 5th so are you saying that when you have a failed damper it cause 5th to fail? I have never had a damper fail either but i would like to remove it before it does.


  • john mueller likes this

Frank
TnT Racing
SCCA Ohio Valley Region
 

Make it Rain - Made Paypal donation of $100+ We have a Winnah! - Won their 1st race... Congratulations! Bona fide - A bonafide Spec Miata driver Donor - Made PayPal donation

#10
davew

davew

    Veteran Member

  • SMembers
  • PipPipPipPipPip
  • 2,297 posts
  • Location:Beloit, Wi
  • Region:Chicago
  • Car Year:1999
  • Car Number:72

Great post, Dave.


I've seen this failure with and without a correlated crush sleeve failure.  I agree with you that if there ISN'T a pinion preload problem, the "mark with chisel and reinstall" method is successful. 


We just need to make sure people don't think they can retorque a sloppy pinion (although I've done it temporarily when there was no other choice, with some success).


Saul, Agreed, just tightening the pinion nut will not fix a bad bearing. But most of the time you can change a the pinion seal or remove the balancer without having to readjust the preload.


Frank, I have seen LOTS of 3rd and 4th gear falures. Every 5th gear failure has been preceeded by a diff flange failure. May be a coincidence, but I am now removing every diff balancer any time we have the driveshaft out.


Dave Wheeler
Advanced Autosports, the nations most complete Spec Miata shop
Author, Spec Miata Constructors Guide, version 1 and 2.0

Building Championship winning cars since 1995

4 time Central Division Spec Miata Champion car builder 2012-2013-2014-2017

Back to Back June Sprints Spec Miata 1-2 finishes 2016 and 2017

5 time June Sprints winner in Mazda's

6 Time Northern Conference Champion Car Builder

2014 SCCA Majors National point Champion car builder

2014 SCCA Runoffs winner, T4 (Bender)

2014 Central Division Champion, ITS (Wheeler)

2013 Thunderhill 25 hour winning crew chief

2007 June Sprints winner, (GT1, Mohrhauser)

Over 200 race wins and counting.
www.advanced-autosports.com
dave@advanced-autosports.com
608-313-1230

Survive the 25, NASA Thunderhill - Survive the 25, NASA Thunderhill We have a Winnah! - Won their 1st race... Congratulations! Sponsor / Advertiser - Site sponsor / advertiser... support these guys! Donor - Made PayPal donation Bona fide - A bonafide Spec Miata driver

#11
Muda

Muda

    ComingToAMirrorNearYou

  • SMembers
  • PipPipPip
  • 365 posts
  • Location:East
  • Region:WDC
  • Car Year:1999

Just remember that the damn things are heavy.  If you like to play fast & loose with weight this will make you closer.


Make it Rain - Made Paypal donation of $100+ Bona fide - A bonafide Spec Miata driver

#12
Brandon

Brandon

    Veteran Member

  • Members
  • PipPipPipPipPip
  • 765 posts
  • Location:North Jersey
  • Region:NNJR
  • Car Year:1996
  • Car Number:48SM

Great post, Dave.


I've seen this failure with and without a correlated crush sleeve failure.  I agree with you that if there ISN'T a pinion preload problem, the "mark with chisel and reinstall" method is successful. 


We just need to make sure people don't think they can retorque a sloppy pinion (although I've done it temporarily when there was no other choice, with some success).

This is where you need an in/lb torque wrench to identify the level of torque required to rotate the pinion before removing the nut.  

If the value is below spec (from the FSM) BEFORE nut removal you probably could use to have a new crush sleeve & appropriate 'differential assembly' procedure performed.


Bona fide - A bonafide Spec Miata driver

#13
Sphinx

Sphinx

    Veteran Member

  • Members
  • PipPipPipPipPip
  • 655 posts
  • Location:Atlanta
  • Region:ATL

For those who cut off the damper, rather than removing the nut, etc., what tools did you use (size)?  How much of a PITA is it? I was talking to a forum member yesterday and he said to cut it off, but rather than spending an hour and half trying to cut it off with tools that will drive me crazy or hunting for tools I don't have, thought I'd crowd source ideas of what's worked.  Anyone drill through it and then chisel it apart?


#14
FTodaro

FTodaro

    Veteran Member

  • SMembers
  • PipPipPipPipPip
  • 3,084 posts
  • Location:Columbus Ohio
  • Region:Great Lakes
  • Car Year:2001
  • Car Number:35

Its way easier to remove the drive shaft, and pull the yoke out, cut the damper off and put it back on about 20 min, job.


I use the Dave Wheeler method, I mark the nut location in relationship to the the pinion threads, then loosen the nut and count the revolutions. Usually about 12 approximately. However you can use your fingers up until the last revolution, and then just tighten it to the marks that you made and your done.


never had an issue doing it that way.


Frank
TnT Racing
SCCA Ohio Valley Region
 

Make it Rain - Made Paypal donation of $100+ We have a Winnah! - Won their 1st race... Congratulations! Bona fide - A bonafide Spec Miata driver Donor - Made PayPal donation

#15
davew

davew

    Veteran Member

  • SMembers
  • PipPipPipPipPip
  • 2,297 posts
  • Location:Beloit, Wi
  • Region:Chicago
  • Car Year:1999
  • Car Number:72

My method with a little more detail:

Remove driveshaft

use center punch to mark location of shaft, nut and flange. All in a row, so they go back together in the same location.

You should have about 1.5 threads showing off the tip of pinion shaft, pay attention.

Remove nut, remove washer, and tap off flange.

I do not have a bearing puller big enough to remove the balancer as one piece.

I mount the flange in a drill press and using a 2.5" hole saw, cut through the rubber.

You could probably stop here. I use my clam shell bearing seperater on the press to remove the inner sleeve of the balancer.

Install a new pinion seal if you feel so inclined.

Reinstall flange while lining it up with the marks.

Install washer and nut. Tighten untill the 3 marks line up, and the shaft has the correct number of threads showing. Then go about 1/8" tighter. Not 1/8 turn, 1/8th inch. I was taught this 20 years ago and have never had an issue when going that hair tighter.

Reinstall driveshaft. I would recomend new Advanced Autosports drive shaft bolts/nuts made by ARP. But that's just me !!!!

Top off or change the fluid.


I also have a tool for holding the pinion flange in place when loosening or tightening the pinion nut.


dave


  • Muda and FTodaro like this

Dave Wheeler
Advanced Autosports, the nations most complete Spec Miata shop
Author, Spec Miata Constructors Guide, version 1 and 2.0

Building Championship winning cars since 1995

4 time Central Division Spec Miata Champion car builder 2012-2013-2014-2017

Back to Back June Sprints Spec Miata 1-2 finishes 2016 and 2017

5 time June Sprints winner in Mazda's

6 Time Northern Conference Champion Car Builder

2014 SCCA Majors National point Champion car builder

2014 SCCA Runoffs winner, T4 (Bender)

2014 Central Division Champion, ITS (Wheeler)

2013 Thunderhill 25 hour winning crew chief

2007 June Sprints winner, (GT1, Mohrhauser)

Over 200 race wins and counting.
www.advanced-autosports.com
dave@advanced-autosports.com
608-313-1230

Survive the 25, NASA Thunderhill - Survive the 25, NASA Thunderhill We have a Winnah! - Won their 1st race... Congratulations! Sponsor / Advertiser - Site sponsor / advertiser... support these guys! Donor - Made PayPal donation Bona fide - A bonafide Spec Miata driver

#16
Ron Alan

Ron Alan

    Veteran Member

  • Members
  • PipPipPipPipPip
  • 3,732 posts
  • Location:Northern CA
  • Car Year:1995

Angle grinder(no guard)with almost worn out cut off wheel(smaller diameter). At an angle(45-60) you can get in the smaller section and cut the weight until you start touching the flange or diff housing. If I remember this is more than half the material...make 2 cuts 180 degrees apart. Big chisel and hammer makes short work of splitting both sides.  Granted, this is what I had to work with at the track and didnt have Dave's knowledge and was afraid to screw up the crush if I removed the pinion nut. Not sure if this would work if the rubber was still connected. Both I've done were already broken. 


Ron

RAmotorsports


Donor - Made PayPal donation Bona fide - A bonafide Spec Miata driver

#17
SaulSpeedwell

SaulSpeedwell

    Veteran Member

  • Members
  • PipPipPipPipPip
  • 792 posts
  • Location:NEOhio

Ron's method is as good as any if you don't want to remove anything from the car, or if the flange is rusted on and won't "tap" off. 


A good "guillotine"-type bearing separator with sharp enough edges will pull the damper and inner sleeve complete, without having to cut rubber.  Don't bother with the Harbor Freight separator for this job, you need something sharper and better.


For faster reply than PM:  miataboxes>>>AT<<<gmail>>DOT<<<com


#18
davew

davew

    Veteran Member

  • SMembers
  • PipPipPipPipPip
  • 2,297 posts
  • Location:Beloit, Wi
  • Region:Chicago
  • Car Year:1999
  • Car Number:72

Ron's method is fine for at track emergency repair. But it only works if the rubber is already broken (the balancer will spin in the flange). Cutting the metal part, if the rubber is still intact, does not work.


Saul is correct, but my bearing seperator is not big enough to work on the flange. The drill press takes about 30 seconds and make life easy.


Dave Wheeler
Advanced Autosports, the nations most complete Spec Miata shop
Author, Spec Miata Constructors Guide, version 1 and 2.0

Building Championship winning cars since 1995

4 time Central Division Spec Miata Champion car builder 2012-2013-2014-2017

Back to Back June Sprints Spec Miata 1-2 finishes 2016 and 2017

5 time June Sprints winner in Mazda's

6 Time Northern Conference Champion Car Builder

2014 SCCA Majors National point Champion car builder

2014 SCCA Runoffs winner, T4 (Bender)

2014 Central Division Champion, ITS (Wheeler)

2013 Thunderhill 25 hour winning crew chief

2007 June Sprints winner, (GT1, Mohrhauser)

Over 200 race wins and counting.
www.advanced-autosports.com
dave@advanced-autosports.com
608-313-1230

Survive the 25, NASA Thunderhill - Survive the 25, NASA Thunderhill We have a Winnah! - Won their 1st race... Congratulations! Sponsor / Advertiser - Site sponsor / advertiser... support these guys! Donor - Made PayPal donation Bona fide - A bonafide Spec Miata driver

#19
Sphinx

Sphinx

    Veteran Member

  • Members
  • PipPipPipPipPip
  • 655 posts
  • Location:Atlanta
  • Region:ATL

For neophytes like me, I found this video that's helpful:  


Any suggestions on how to torque the pinion nut?  I initially had the idea of using a piece of angle iron with two holes drilled to hold the flange while I torqued the bolt.  I realized that I don't think that will work, though Dave's post suggests that the nut can be torqued by holding the flange still.  I would have thought that at some point, the pinion starts to turn independent of the flange.  Hence my next question:  does the flange slip on one way (onto a notch, etc.) or does it have to be aligned manually?


#20
steveracer

steveracer

    Blue Eyes, Aquarius, hates being squeezed to the grass in SowDiv

  • SMembers
  • PipPipPip
  • 404 posts
  • Location:Austin, Tx
  • Region:Lone Star
  • Car Year:1999
  • Car Number:92

The pinion and flange are splined, so no slipping.


Steven Holloway

Artist formerly known as Chief Whipping Boy for Lone Star Region

Donor - Made PayPal donation Bona fide - A bonafide Spec Miata driver


1 user(s) are reading this topic

0 members, 1 guests, 0 anonymous users