


 Sign In
 Create Account
This is the stuff, Permatex Ultra Gray. Most auto parts stores stock it.
http://www.permatex....asket_Maker.htm


Clutch Replacement

Started by
Tom Hampton
, 04-26-2011 01:58 PM
#41

 Posted 08-09-2012 01:44 PM
dstevens
-

- SMembers
-

- 1,404 posts
Veteran Member
- Location:Vegas
- Region:LVR
 Back to top
 Report
#42
Posted 08-09-2012 01:58 PM
Keith Novak
-

- SMembers
-
- 1,128 posts
Steadily Improving Member
- Location:Seattle
- Region:Northwest/Oregon
- Car Year:1995
- Car Number:88
I use the high temp P/N 59214. The little 6ml tube lasts a long time. It doesn't dry up if you remember to put the cap on. Just shake well before use.


#43
Posted 08-09-2012 02:59 PM
Brendan O
-
- Members
-
- 215 posts
Member
- Location:Huntsville, AL
- Region:SE
- Car Year:2003
#44
Posted 08-09-2012 06:05 PM
Jim Boemler
-
- Moderators
-

- 852 posts
Veteran Member
- Location:Mukilteo WA
- Region:NWR
- Car Year:1992
- Car Number:30
I lost an engine to the rubber plug on the head, but the stock replacement plug is pretty flimsy. I cut a short length of hose, and plugged the end, to use instead of the stock plug. Now I know it's not gonna go again, ever.
#45
Posted 01-03-2014 02:26 PM
Necio
-
- Members
-
- 3 posts
Junior Member
- Location:Los Angeles
- Region:South Pacific
- Car Year:1997
I currently replacing the clutch plate, and all the accutrements attached to it, flywheel, and pressure plate.
I have a huge problem removing a thing which looks like a castelated beam it is attached with 17 mm bolts. As far as I can tell this is an angle which supporst the trasmission it is a very long angle about 1/4" thick. I removed all the long bolts as far as I can tell., However, the thing refuses to be removed. Does anybody outhere knows if there is a bolt or any attachment hidden from view at the rear of the car.
I spent an hour already with no sucess, please note, the front bolts have already been removed.
Any help will be greately appreciated.
RG
#46
Posted 01-03-2014 03:01 PM
Alberto
-

- Members
-
- 1,471 posts
Veteran Member
- Location:Mountain View, CA
- Region:SFR
- Car Year:1990
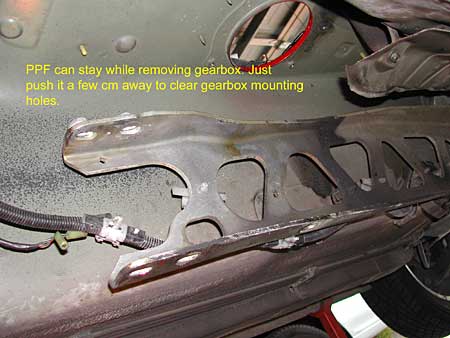
I think you be referring to the Power Plant Frame attached to the rear of the transmission (and front of the rear differential). Looks like this:
There are the two long bolts attaching the PPF to the rear of the trans and then, if I remember correctly, 1 more (14mm?) a little further back. Once those are removed, use a pry bar to move the PPF to the side of the trans.
Check this for a tutorial
http://www.miata.net/garage/clutch/
#47
Posted 01-03-2014 03:02 PM
Alberto
-
- Members
-
- 1,471 posts
Veteran Member
- Location:Mountain View, CA
- Region:SFR
- Car Year:1990
#48
Posted 01-03-2014 04:31 PM
Bench Racer
-
- Members
-
- 5,508 posts
Different strokes for different folks : )
- Location:Wauwatosa, WI
- Region:Milwaukee
- Car Year:1990
- Car Number:14
I removed all the long bolts as far as I can tell., However, the thing refuses to be removed. Does anybody outhere knows if there is a bolt or any attachment hidden from view at the rear of the car.
RG
Alberto is giving you the short answer.
RG, do you have a Miata Factory Shop Manual? If the answer is yes, turn to the Differential section P-39.
There are some per say hidden items. First loosen the two long differential bolts that hold the PPF to the differential untill the bolts are free of the two knurled flange spacers that are anchored to the top leg of the PPF. Take a mirror and light and you will see the knurled spacer heads on the top side of the PPF. Also feel with your hand. Presuming the bolts are free to move up and down, move the bolts up untill they touch the bottom side the the two knurled spacers, a light tap with a hammer will push the knurled spacers out of the top leg of the PPF. Don't with force rotate the knurled spacers because you will damage the knurled holes in the PPF. Now remove both bolts. Under the head of the front bolt is what looks like a flat washer with two flats. It's really a headed spacer that can be removed after the front bolt is removed. Now remove the bolt that holds the spacer to the differential between the lower ear and the lower leg of the PPF, then remove the spacer. Also at the top end of the front bolt is a tube spacer you can not see. There is a block between two ears on the differential with a M6x1 threaded hole. Screw a M6X1 bolt into the threaded hole, it will press up to the tube spacer that you can not see and hold the spacer from rotating. Now take the rear LONG bolt, insert in the front hole and screw the long bolt into the threaded spacer several rotations, unscrew the M6x1 bolt and pull the spacer downward and remove the bolt. At this point you should be able to remove the spacer with two holes that is between the top leg of the PPF and the top differential ear. The PPF should now be free to move out of position.
All of the above is presuming everything was oiled and free to rotate/move. The Factory Shop Manual says not to remove the knurled spacers. I have removed them from several cars and gently reinserted (rotate with fingers and press into the start of the knurl, then gently pull with correct bolts into their final position) them with zero negative results.
Folks,if I missed anything please feel free to add to the thread.

#49
Posted 05-22-2014 11:55 AM
miata4me
-
- Members
-
- 34 posts
Member
- Car Year:1999
- Car Number:91
Assuming all goes well and I use the step by step directions provided, anyone care to provide a guestimate as to how long replacing the clutch should take? I'm not a Mazda mechanic, but I am not a total novice in the garage either...
#50
Posted 05-22-2014 02:41 PM
Parity
-
- Members
-
- 415 posts
Member
- Location:Pennsylvania
- Region:North East
- Car Year:1999
- Car Number:51
My first time took about 4 hours for clutch and trans. Shop rate is about 2 hours.
#51
Posted 05-22-2014 08:34 PM
Brandon
-

- Members
-
- 765 posts
Veteran Member
- Location:North Jersey
- Region:NNJR
- Car Year:1996
- Car Number:48SM
For me the biggest difficulty was maneuvering the transmission with a non-transmission jack. I had an "H-pattern" insert (instead of the normal jack seat/saddle) which gave a bit better support but it left a lot to be desired in the leverage department.
Ensuring the engine is tilted backwards (some have found it helpful to remove the coil pack to to enable a further backwards tilt) enough straightens the shot to seating the transmission.
Hitting the high points on tips to speed the R&R (and what to check while you're in there):
- Raise the car as high as you can on jack stands if you don't have a lift
- Tilt the engine backwards far enough; use a 2x4 wedged under the oil pan, don't wedge it under the crank as you may need to spin the engine to get the splines to line up between the trans & clutch
- Using a proper "transmission jack" might be a bigger help (something to "fix" the transmission to for example)
- Attempt to ensure a 'thunk' when seating the transmission; do not use the bolts to draw the transmission to the block!!
- Confirm you don't have any weeping of any oil from the flywheel; the bolts pass through the crank into the oil pan and require the sealant on the bolts folks mentioned earlier in the thread
- Check the wear parts for need of replacement (throw out bearing, pilot bearing)
I took a couple days to do mine so I can't give an accurate answer to an absolute number of hours.
HTH,
Brandon
#52
Posted 05-23-2014 06:19 AM
Bench Racer
-
- Members
-
- 5,508 posts
Different strokes for different folks : )
- Location:Wauwatosa, WI
- Region:Milwaukee
- Car Year:1990
- Car Number:14
Doing an on your back floor job changing transmission with my ITA RX7 I would jack the rear of the car higher than the front so the centerline of crank shaft was parallel with the floor. With transmission on floor jack, it took less mussel and playing to get stuff aligned.
- Derrick Ambrose likes this

0 user(s) are reading this topic
0 members, 0 guests, 0 anonymous users

