my 1.6 engine rebuild thread
#81

 Posted 04-10-2014 01:40 PM

3 podium finishes
2 2013 NASA nats
1 2013 Scca runoffs


#82

 Posted 04-10-2014 01:59 PM

#83

 Posted 04-14-2014 10:30 PM

So the 'team' came by on Sat. Together we cranked through the TO DO list:
- install flywheel and clutch
- mate the trans to the motor
- install my custom valve cover ![]()
- drop the motor into the car
Dropping the motor in the car was a pita for some reason. Probably lack of practice. ![]()
First, we couldn't get the driver side engine mount into it's home. That took a bunch of up and down with the engine hoist and lots of shoving but we finally got it in.
Next, I couldn't mate the rear of the trans to the PPF. So we had to make a custom PPF positioning tool (aka 2' long 2x4) to persuade the PPF into position. The top part was fighting us but Terry got it in.
Once that was done, I realized that I had forgotten to the feed the driveshaft into the rear of the trans when we were dropping in the motor like I had planned. So I had to unbolt the driveshaft from the diff. The bolts fought me. After a lot of cursing, they finally gave up and I got the driveshaft in.
Johhny, Brandon and Terry were working the top of the motor bolting everything together while I was under the car fighting with the driveshaft.
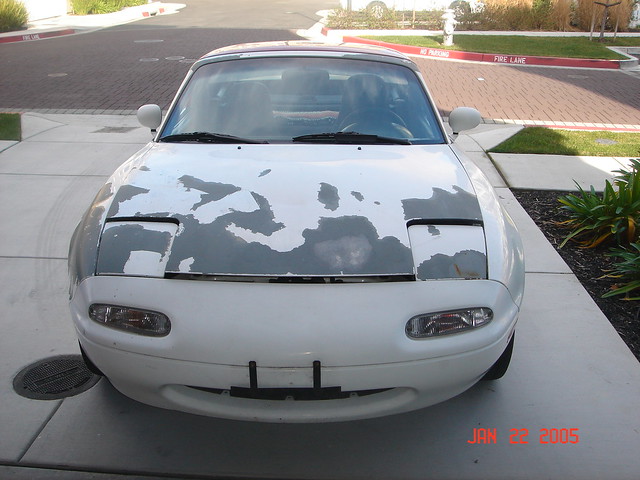
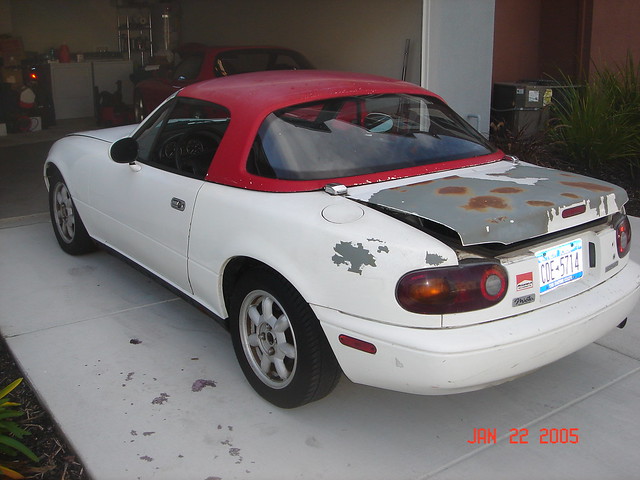
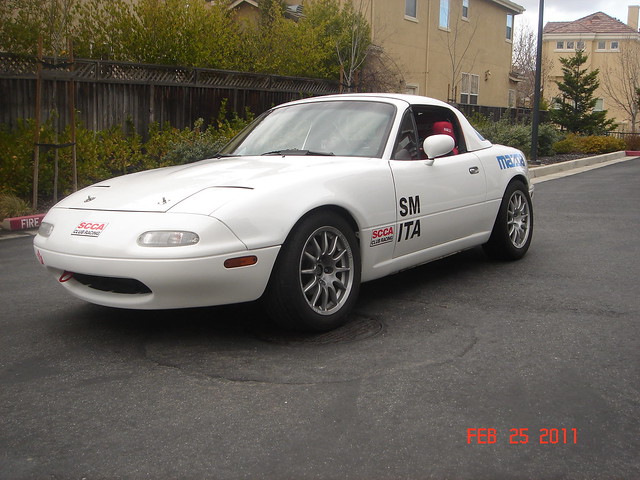
This was by far the biggest project I have ever done. Before this the biggest project was building the car and transforming it from this rusty hulk:


To this:

Following that vein, the engine went from the original, well maintained but slightly tired motor:
To this: ![]()
Yes, I painted the motor. I had time due to all the setbacks so decided to make it look nice. I won't have the most powerful motor out there but I will have the nicest looking. ![]()
Thanks to those that helped me with this project. Long list of names... Austin, Brandon, "Bench Racer", Chris Halderman, Dave @ Advanced Autosports, DT Stevens Johnny D, Jim Drago, Keith Novak, Richard L, Ron G and the good folks at Bay Area Miata Drivers [local] club and Miata.net. Couldn't have done it w/o the support of my friends and the community.
- Johnny D likes this

#84

 Posted 04-14-2014 10:31 PM

#85

 Posted 04-14-2014 10:39 PM

- Alberto likes this
3 podium finishes
2 2013 NASA nats
1 2013 Scca runoffs


#86

 Posted 04-14-2014 11:12 PM

Thanks Chris. Totally agree.
Last pic before I hit the sack. Everyone's favorite racing grandpa (that'd be JohnnyD) after mating trans and engine. ![]()
- Johnny D likes this

#87

 Posted 04-14-2014 11:14 PM

For the next install...leave the driver side motor mount out. When you get the passenger side down in the hole...reach the driver side in by hand and set it in the hole then start the 3 bolts into the block. Obviously the motor is still hanging on the hoist during this. I think I have also put the motor mount in its spot on the subframe and let the motor slide down past it until I could start the 3 bolts.
Ron
RAmotorsports


#88

 Posted 04-15-2014 10:27 AM

Yeah, the valve train is pretty noisy. I'm using new HLAs. Hoping that it is just the HLAs getting oiled for the first time. My old HLAs were not good. Some were easily compressed with minimal pressure. Some would compress about 1mm and then stop. Some were pretty scratched up on the sides.
I'm using the cheap ebay ones - cuz that's how I roll. ![]() I thought about getting the Kia or Sealed Power HLAs but at $20 each vs $85 for 16, I figured I'd cheap out and see how that works.
I thought about getting the Kia or Sealed Power HLAs but at $20 each vs $85 for 16, I figured I'd cheap out and see how that works.
Thanks.

#89

 Posted 04-15-2014 11:26 AM

Did you soak the HLA's in oil before installing?
I tried the cheap ebay ones. I no longer use them. Probably ok at 3000 rpm. But not at 7000 rpm.
Dave
Dave Wheeler
Advanced Autosports, the nations most complete Spec Miata shop
Author, Spec Miata Constructors Guide, version 1 and 2.0
Building Championship winning cars since 1995
4 time Central Division Spec Miata Champion car builder 2012-2013-2014-2017
Back to Back June Sprints Spec Miata 1-2 finishes 2016 and 2017
5 time June Sprints winner in Mazda's
6 Time Northern Conference Champion Car Builder
2014 SCCA Majors National point Champion car builder
2014 SCCA Runoffs winner, T4 (Bender)
2014 Central Division Champion, ITS (Wheeler)
2013 Thunderhill 25 hour winning crew chief
2007 June Sprints winner, (GT1, Mohrhauser)
Over 200 race wins and counting.
www.advanced-autosports.com
dave@advanced-autosports.com
608-313-1230


#90

 Posted 04-15-2014 11:30 AM

What oil are you using pure synthetic, petroleum or a blend? Pure synthetic can cause noisy HLAs. My engine builder recommended making my own blend with 1/2 synth and 1/2 petrol.


#91

 Posted 04-15-2014 11:52 AM

Did you soak the HLA's in oil before installing?
I tried the cheap ebay ones. I no longer use them. Probably ok at 3000 rpm. But not at 7000 rpm.
Dave
I did not soak them. Didn't know I was supposed to do that... They came packaged in little sealed baggies with oil inside so I figured that would be OK. I did lube them up pretty well on all sides, top and bottom with Redline Assembly Lube.
I saw your posts on the cheap HLAs but budget dictated cheap ones. I'm expecting to have to replace them sooner than better quality ones but I have no idea what the better quality brand is and what the proper cost point is. Didn't seem like anyone wanted to share any of these 'secrets' so I didn't ask.
Have you or anyone else observed a failure symptom on these cheap ones? What happens at 7000 that I should watch for?
Thanks.
What oil are you using pure synthetic, petroleum or a blend? Pure synthetic can cause noisy HLAs. My engine builder recommended making my own blend with 1/2 synth and 1/2 petrol.
For that first start, I used Shell Rotella 15/40 diesel oil. Dumped it after the engine came up to temps and replaced with Amsoil break-in. It looked like this when I drained it. It's a reddish tinged, medium dark brown color.

#92

 Posted 04-15-2014 11:57 AM

Against FSM directions: I disassembled mine down to the little spring/ball assy...
Gave them a nice clean and then put them back together with abundant engine oil in them.
I looked for scratches or sign of wear but they looked "good" to me, so they went back in the engine. They've been nice and quiet so far.
I've ran the engine a couple WE on regular oil. Just switched to synthetic for the upcoming WE...
my 2 cents of course!


#93

 Posted 04-15-2014 11:58 AM

For the next install...leave the driver side motor mount out. When you get the passenger side down in the hole...reach the driver side in by hand and set it in the hole then start the 3 bolts into the block.
I can see how that would help a lot... Great tip Ron!


#94

 Posted 04-15-2014 12:27 PM

Good stuff.
Will the budget allow a dyno tune of fuel pressure, AFM tilt and timing???


#95

 Posted 04-15-2014 12:52 PM

Good stuff.
Will the budget allow a dyno tune of fuel pressure, AFM tilt and timing???
Yes, it absolutely needs to. New trailer tires too. Not to mention my annual contribution to the gov't via the income tax raping they are giving me again.
I think I'm going to remove the Advanced Autosports Adjustable Fuel Pressure regulator and re-install the stock one and stock AFM until I can get tuned. Not sure how much the airflow and fuel needs change with a freshly built, normally aspirated motor. I know you need to be careful about that with turbo rotaries - which is where most of my 'tuning' experience comes from.
Along with the tuning, I'd like to get the motor sealed so that I can the regional Sealed Spec Miata class which caps you at ~113 or 115 rwhp. That's $350 with the tuning.

#96

 Posted 04-21-2014 12:21 PM

So, the motor is enjoying the break-in oil much more than the Shell dino oil. The lifter noise is all gone. On Sat, I borrowed my neighbor's timing light and attempted to check timing. Never done that before but it looked like it was in spec.
Sat night, I took the car out on a deserted road near my house for a little while to give it a bit of a break-in. Lots of threads on how to break-in a motor but I basically followed the break-in procedure on Flyin Miata's web site.
Sat night didn't go so well. The car came up to temp while idling and driving slowly but as soon as the car started moving, the engine temps would drop to 140*. I had originally installed the old OEM thermostat that I had sitting around. Seems like it was stuck open - or not working as designed for some reason. I removed it and installed the NAPA 180* thermostat that I had been using last season and took it out on Sunday night. Problem fixed.
After running it up and down the rev range in 3rd gear for a few 'laps' (probably ~20 times), I pulled it into the garage and noticed that one of the lifters at the front of the intake camshaft was ticking. Going to have to keep an eye and ear on that... Everything else looks good. Haven't seen any leaks. Didn't notice any oil consumption. Water levels look OK.
The motor feels like it makes a more power at the top of the rev range. Feels about the same in the mid range if I remember correctly. It is odd that my race car is the slowest, lowest HP car in my fleet... After driving my RX7 during the day on Sat and Sun with a 9.3 power to weight ratio, the Miata feels so slow....
Started it up again this morning and no lifter tick. Dropped it off at TC Design and got tech'ed for NASA. Hoping to make this weekend's event at Thunderhill. Wish me luck. I'll need it. Haven't been on track since Sept or so.
Oh, almost forgot. I noticed some moldy looking crap inside where the spark plug wire connects to the #1 coil. Going to ohm out out the coils later. I haven't seen any threads on testing coils but I did see the procedure in the FSM. Is it a reliable testing procedure?
I guess I should test the spark plug wires too. These have been on there since 2011 now.

#97

 Posted 04-21-2014 12:56 PM

#98

 Posted 04-21-2014 03:02 PM

You need new coils and plug wires. That" moldy looking crap" is caused by high electrical load, coupled with high resistance. Add in temp and high RPM and you will have a problem. Maybe not today, but you will. remember your ohm meter works on a 9 volt battery, while the coils put out 10,000 volts. Do you think that makes a difference????
Dave
Dave Wheeler
Advanced Autosports, the nations most complete Spec Miata shop
Author, Spec Miata Constructors Guide, version 1 and 2.0
Building Championship winning cars since 1995
4 time Central Division Spec Miata Champion car builder 2012-2013-2014-2017
Back to Back June Sprints Spec Miata 1-2 finishes 2016 and 2017
5 time June Sprints winner in Mazda's
6 Time Northern Conference Champion Car Builder
2014 SCCA Majors National point Champion car builder
2014 SCCA Runoffs winner, T4 (Bender)
2014 Central Division Champion, ITS (Wheeler)
2013 Thunderhill 25 hour winning crew chief
2007 June Sprints winner, (GT1, Mohrhauser)
Over 200 race wins and counting.
www.advanced-autosports.com
dave@advanced-autosports.com
608-313-1230


#99

 Posted 04-21-2014 03:21 PM

You need new coils and plug wires. That" moldy looking crap" is caused by high electrical load, coupled with high resistance. Add in temp and high RPM and you will have a problem. Maybe not today, but you will. remember your ohm meter works on a 9 volt battery, while the coils put out 10,000 volts. Do you think that makes a difference????
Dave
I honestly don't know but I'm guessing by your answer that it does. ![]() That knowledge is the different between a professionally trained mechanic and some shade tree wrench like me.
That knowledge is the different between a professionally trained mechanic and some shade tree wrench like me. ![]()
Thanks Dave.
Ordered up some new coils from our pals at Mazda Motorsports. Also ordered some Mac's Custom Tie Downs to replace the junk that is in the trailer now. 2 new tires for the trailers to replace the one that got damaged when the idiots at the tire place installed a C rated tire instead of a D rated tire and bought a spare since I didn't have one for the trailer. All this before I can even get out on track. Talk about expensive addictions...

0 user(s) are reading this topic
0 members, 0 guests, 0 anonymous users


 Sign In
 Create Account


 Back to top
 Report


