Jump to content

Photo

my 1.6 engine rebuild thread

- - - - -

  • Please log in to reply
98 replies to this topic

#61
Alberto

Alberto

    Veteran Member

  • Members
  • PipPipPipPipPip
  • 1,471 posts
  • Location:Mountain View, CA
  • Region:SFR
  • Car Year:1990

Thanks gents. 


Ron, I was trying to get this done today.  I'll be making some calls tomorrow if no one can confirm on the piston ring.  For the record, Haag's a good guy and builds some great motors.  Have recommended him to various friend's and competitors some of whom are now running his engines - and kicking my ass but that's not just b/c of engine. :)


Bona fide - A bonafide Spec Miata driver

#62
Alberto

Alberto

    Veteran Member

  • Members
  • PipPipPipPipPip
  • 1,471 posts
  • Location:Mountain View, CA
  • Region:SFR
  • Car Year:1990

Figured it out with the help of Richard's pic and the more recent version of the FSM that the boys at Mazda Motorsports sent me earlier today.


The FSM on Tom Hamton's link is an older version.  That is the one I have been using.  Turns out things change over time.  Imagine that :disc:


Old version of FSM:

pistonring-old.jpg

New version with 3 options on marking for the top ring.  Three!

pistonring-new.jpg


Thanks for the help Richard!


Bona fide - A bonafide Spec Miata driver

#63
Bench Racer

Bench Racer

    Different strokes for different folks : )

  • Members
  • PipPipPipPipPip
  • 5,508 posts
  • Location:Wauwatosa, WI
  • Region:Milwaukee
  • Car Year:1990
  • Car Number:14

Thanks, copied and in FSM. How much did you radially rotate/stager the second and first ring to the oil rings. Went searching/reading a bit on ring end gaps, interesting gains with tighter gaps. 


Broken record - You are starting to sound like a broken record. Donor - Made PayPal donation Bona fide - A bonafide Spec Miata driver

#64
Alberto

Alberto

    Veteran Member

  • Members
  • PipPipPipPipPip
  • 1,471 posts
  • Location:Mountain View, CA
  • Region:SFR
  • Car Year:1990

The FSM has a diagram that explains the ring stagger.  Don't have it handy.  Took me a couple of attempts to get the oil rings staggered correctly as I was interpreting the diagram incorrectly.  I'll post more on that over the weekend once I'm finally able to install the top ring.  The top and middle ring float around freely so the staggering of those really needs to take place as you install them in the piston ring compressor as you feed them into the cylinders.  


Interesting learning experience.  I'm planning on doing a lessons learned summary at the end.  I've tripped over a lot of idiotic things (like piston ring markings) that you only learn from experience.  I haven't seen any documentation of these pitfalls before.  If I had to do this again, the rebuild would be done 75% faster.  


Hopefully this motor will turn out well and I'll have a nice reliable motor that is competitive within the Sealed class for Regional racing.  Not sure what will happen if it doesn't turn out ok...


Bona fide - A bonafide Spec Miata driver

#65
fotostars

fotostars

    Member

  • Members
  • PipPipPip
  • 312 posts
  • Location:Norcal
  • Car Year:1997
  • Car Number:63

Hey Alberto, FYI after a few days of no trouble coaching at HOD with my new motor, I started the racing WE by loosing a freeze plug during practice this morning.


Everybody was like: ...", why did you even remove them when you did your rebuild?"... Well, I did replace them all, removed them to have the block cleaned/honed. I installed new ones from Mazda with #2 Permatex and a hammer as per instructions. Not sure what I did wrong but one popped-out, puked all my water and the temp when up really fast. Killed the engine, wait for tow.


Drove in town, got a replacement for $0.58+tax and then managed to put it on. It's the one close to the oil filter. Took the filter, the oil coolant, the intake bracket and the alternator out. Managed to hammer it in.


Then ran my 2 races in the afternoon! So make sure you put them on right... (whatever that means, I still don't know what I did wrong) :-<


Survive the 25, NASA Thunderhill - Survive the 25, NASA Thunderhill Bona fide - A bonafide Spec Miata driver

#66
Alberto

Alberto

    Veteran Member

  • Members
  • PipPipPipPipPip
  • 1,471 posts
  • Location:Mountain View, CA
  • Region:SFR
  • Car Year:1990

Wow, that doesn't sound like fun.


The machine shop removed my freeze plugs also so they could get the innards of the cooling chamber nice and clean.  I pounded mine in after applying some Ultra Black Permatex.  I noticed that my untouched spare block had the freeze plugs counter sunk about 1mm so I did the same on the block I'm using for the rebuild.  Hopefully, mine hold up.


Bona fide - A bonafide Spec Miata driver

#67
fotostars

fotostars

    Member

  • Members
  • PipPipPip
  • 312 posts
  • Location:Norcal
  • Car Year:1997
  • Car Number:63

Back from the WE, after putting a new plug, I did 2 races on Sat, 1.5h on the dyno and then all of Sunday (Practice, Qual, Race, Race).

Engine's good, no more leak...


Survive the 25, NASA Thunderhill - Survive the 25, NASA Thunderhill Bona fide - A bonafide Spec Miata driver

#68
Alberto

Alberto

    Veteran Member

  • Members
  • PipPipPipPipPip
  • 1,471 posts
  • Location:Mountain View, CA
  • Region:SFR
  • Car Year:1990

So, this is what the bevel looks like on the top / 1st ring of the 1.6 piston ring set from Mazda Motorsports.  I couldn't see that bevel until I knew to look for it.  And even then, I could only really notice it when I stacked the rings together against a white back drop.  I also needed to remove my glasses to look at it closely but let's not dwell on that topic... <_<  2 other software engineers couldn't see it either so I shouldn't feel too, too bad...  There's gotta be a joke in there somewhere...

IMG_2438.JPG


I'm going to stack the rings again this weekend.  I had originally used assembly lube on the rings but that didn't seem right to pack the ring grooves and oil control rings with goo.  Googled a bit and found a bunch of internet experts on either side of the topic of whether to use assembly lube or oil on piston rings.  Ultimately decided to remove the rings that I had already installed and clean everything up again and use oil instead. 


During that research, I saw some pics of the underside of the stock pistons that looked like this (from the old specmiata.com board):

PistonBottom.gif


However, the underside of the pistons of my early 90 (1989 build date) don't look like that.  They look like this:

IMG_2441.JPG


Kinda odd.  Anyone have any input on why my early pistons look like this?  Should they look like this?


Thanks.


Bona fide - A bonafide Spec Miata driver

#69
Bench Racer

Bench Racer

    Different strokes for different folks : )

  • Members
  • PipPipPipPipPip
  • 5,508 posts
  • Location:Wauwatosa, WI
  • Region:Milwaukee
  • Car Year:1990
  • Car Number:14

Software engineers do stuff they can't visually see.  Attempted to paste a magnfying eye piece.


Is that waffled area right side by chance the area the squirted oil splashes/hangs/cools piston better???


Thanks for the up dates.


Broken record - You are starting to sound like a broken record. Donor - Made PayPal donation Bona fide - A bonafide Spec Miata driver

#70
Alberto

Alberto

    Veteran Member

  • Members
  • PipPipPipPipPip
  • 1,471 posts
  • Location:Mountain View, CA
  • Region:SFR
  • Car Year:1990

Is that waffled area right side by chance the area the squirted oil splashes/hangs/cools piston better???


Thanks for the up dates.


According to Steve Scheifler, it is:

http://forum.specmia...44;t=002439;p=0


Thanks.


Bona fide - A bonafide Spec Miata driver

#71
Bench Racer

Bench Racer

    Different strokes for different folks : )

  • Members
  • PipPipPipPipPip
  • 5,508 posts
  • Location:Wauwatosa, WI
  • Region:Milwaukee
  • Car Year:1990
  • Car Number:14

According to Steve Scheifler, it is:

I miss that ^ guy. Last we talked he was caring for his ill mom.


Broken record - You are starting to sound like a broken record. Donor - Made PayPal donation Bona fide - A bonafide Spec Miata driver

#72
Alberto

Alberto

    Veteran Member

  • Members
  • PipPipPipPipPip
  • 1,471 posts
  • Location:Mountain View, CA
  • Region:SFR
  • Car Year:1990

I miss that ^ guy. Last we talked he was caring for his ill mom.


Never knew him but he did make some useful, informative threads back in the day.  Hope his mom improved / is improving. 


Bona fide - A bonafide Spec Miata driver

#73
chris haldeman

chris haldeman

    Veteran Member

  • Members
  • PipPipPipPipPip
  • 928 posts
  • Location:Mckinney
  • Region:texas
  • Car Year:1999
  • Car Number:73
Only tip I'm giving away as an engine builder. Bores,rings,and pistons get assembled dry!! Lube the wrist pins only. This method greatly accelerates break In and ring seal
X-factorracing.com
3 podium finishes
2 2013 NASA nats
1 2013 Scca runoffs
Donor - Made PayPal donation Bona fide - A bonafide Spec Miata driver BFG Supertour Winner - Circuit of the Americas Winner - Majors Winner - Make it Rain - Made Paypal donation of $100+ We have a Winnah! - Won their 1st race... Congratulations!

#74
RazerX

RazerX

    Member

  • Members
  • PipPipPip
  • 318 posts
  • Region:N. Cal
  • Car Year:1999
  • Car Number:11

So, this is what the bevel looks like on the top / 1st ring of the 1.6 piston ring set from Mazda Motorsports.  I couldn't see that bevel until I knew to look for it.  And even then, I could only really notice it when I stacked the rings together against a white back drop.  I also needed to remove my glasses to look at it closely but let's not dwell on that topic... <_<  2 other software engineers couldn't see it either so I shouldn't feel too, too bad...  There's gotta be a joke in there somewhere...

IMG_2438.JPG


I'm going to stack the rings again this weekend.  I had originally used assembly lube on the rings but that didn't seem right to pack the ring grooves and oil control rings with goo.  Googled a bit and found a bunch of internet experts on either side of the topic of whether to use assembly lube or oil on piston rings.  Ultimately decided to remove the rings that I had already installed and clean everything up again and use oil instead. 


During that research, I saw some pics of the underside of the stock pistons that looked like this (from the old specmiata.com board):

PistonBottom.gif


However, the underside of the pistons of my early 90 (1989 build date) don't look like that.  They look like this:

IMG_2441.JPG


Kinda odd.  Anyone have any input on why my early pistons look like this?  Should they look like this?


Thanks.


is the bevel the same on both sides of the top ring?  Looks like it from the picture 


 - Speed


We have a Winnah! - Won their 1st race... Congratulations! Survive the 25, NASA Thunderhill - Survive the 25, NASA Thunderhill Bona fide - A bonafide Spec Miata driver

#75
Alberto

Alberto

    Veteran Member

  • Members
  • PipPipPipPipPip
  • 1,471 posts
  • Location:Mountain View, CA
  • Region:SFR
  • Car Year:1990

Only tip I'm giving away as an engine builder. Bores,rings,and pistons get assembled dry!! Lube the wrist pins only. This method greatly accelerates break In and ring seal


Thanks for that.  A bit too late for me though as I had some time after my post yesterday evening and installed the piston rings and slid them into the cylinders.  I followed the FSM procedure with a wee bit of oil on the piston sides and rings to try and avoid scratching during the ring install.  The first time I installed rings on a piston last week it took me about half an hour to do one.  I got all 4 done in 15 minutes last evening.  Experience helps...  I used a generous amount of oil on the cylinder walls so I don't scratch / fudge them up.  Being the amateur that I am that is a real risk. :)


Feeding the pistons into the cylinder was a challenge.  I used one of those cheapo Lisle piston ring compressors.  Pain in the ass.  When tightening, it would jostle the ring position around a bit.  Next time (if there is a next time), I'm going to splurge for one of the expensive piston ring compressor tools.  Hopefully, I didn't totally hose that job.  Going to see if I can check the ring positions with the pistons in the cylinder in a bit. 


The goal for today is to plastigage the piston connecting rods and then start assembling the rest of the motor.  Wish me luck.


Bona fide - A bonafide Spec Miata driver

#76
Alberto

Alberto

    Veteran Member

  • Members
  • PipPipPipPipPip
  • 1,471 posts
  • Location:Mountain View, CA
  • Region:SFR
  • Car Year:1990

is the bevel the same on both sides of the top ring?  Looks like it from the picture 


I can't answer 100% at this point since they are installed already.  It might have a bevel on the bottom also but it doesn't seem as pronounced when I zoom into the pic.  Either way, I used that pic as a reference.  The white dot wound up being on the right side with what I thought was the beveled edge in the top facing orientation.  If there indeed was the same bevel on the bottom as well, then the orientation could have gone either way. 


I miss apex seals...


Bona fide - A bonafide Spec Miata driver

#77
edusti

edusti

    Junior Member

  • Members
  • Pip
  • 2 posts
  • Location:MD
  • Region:DC
  • Car Year:1990
  • Car Number:26

so did you get your engine completed in time???


#78
Johnny D

Johnny D

    Veteran Member

  • Moderators
  • 6,121 posts
  • Location:Fremont, CA
  • Region:San Francisco
  • Car Year:1999
  • Car Number:88

It's going in this weekend.

Cheers or tears ?? Will see. :optimist:

J~


2011 NASA Western Endurance Racing Championship E3 Champ
We have a Winnah! - Won their 1st race... Congratulations! Beta-Tester - Assisted us with beta testing the website. Donor - Made PayPal donation Bona fide - A bonafide Spec Miata driver Novel Approach - When a paragraph simply won't do... Survive the 25, NASA Thunderhill - Survive the 25, NASA Thunderhill Instigator - Made a topic or post that inspired other Make it Rain - Made Paypal donation of $100+

#79
Alberto

Alberto

    Veteran Member

  • Members
  • PipPipPipPipPip
  • 1,471 posts
  • Location:Mountain View, CA
  • Region:SFR
  • Car Year:1990

Completed in time to miss 2 races so far. :)  Thankfully both were wet weekends so not a total loss.


To do list currently includes:

- attach flywheel and clutch and pilot bearing

- mate trans to motor

- attach water pipes on the driver side of the engine

- valve cover

- insert into engine bay.

- pray it starts and runs like it's supposed to...


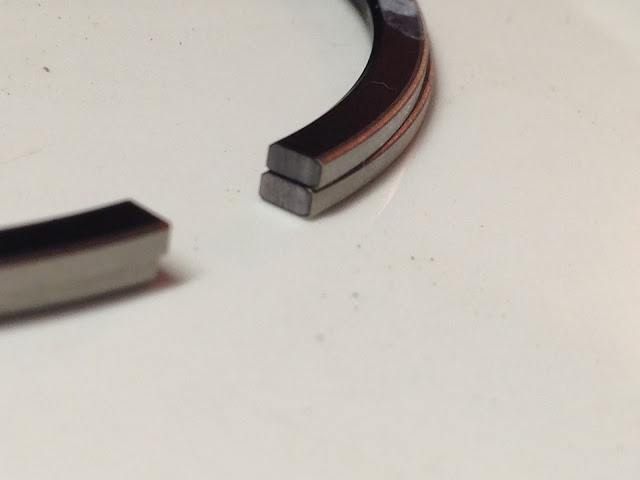
Once I started putting the pistons in and sealing things up, it got a bit messy.  A bit too much effort to stop, remove oily, messy gloves, take pic, get new gloves...  Also, I've been too busy lately with work to do a write but it will happen soon.  I always find build threads to be an entertaining read and that was my original plan with this thread but it didn't quite work out that way...


At this point, this won't be as much of an "as I build" thread.  Will be more of a "this is what I built after stumbling across all the issues in this thread". :)  Will be including lessons learned so other idiots like me don't stumble upon the same issues.  


Got one last minute question for the brain trust though.


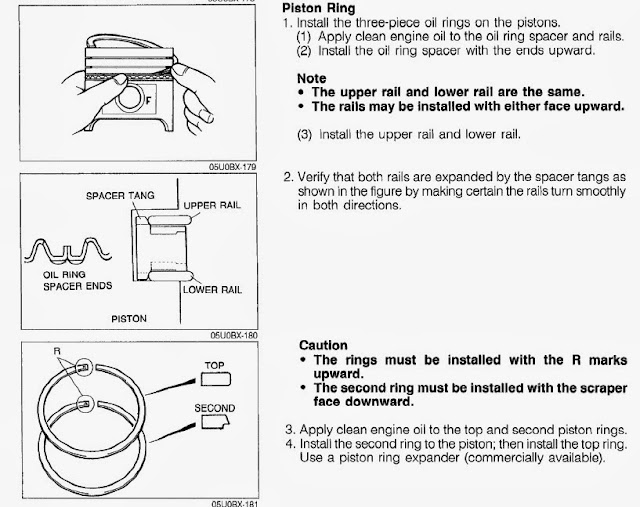
Does the 1.6 BNC specific oil pump require an o-ring at the oil feed into the block?  


The Mazda Motorsports sourced rebuild kit did not include such an o-ring but did include a paper gasket - which is what I used.  


FSM says that only the 1.8 engines use an o-ring and sealant instead of a gasket but I stumbled upon some threads recently that have me questioning this..


Thanks.


Bona fide - A bonafide Spec Miata driver

#80
chris haldeman

chris haldeman

    Veteran Member

  • Members
  • PipPipPipPipPip
  • 928 posts
  • Location:Mckinney
  • Region:texas
  • Car Year:1999
  • Car Number:73
1.6 uses a gasket. Unless your oil pump has the groove in it for the oring.
X-factorracing.com
3 podium finishes
2 2013 NASA nats
1 2013 Scca runoffs
Donor - Made PayPal donation Bona fide - A bonafide Spec Miata driver BFG Supertour Winner - Circuit of the Americas Winner - Majors Winner - Make it Rain - Made Paypal donation of $100+ We have a Winnah! - Won their 1st race... Congratulations!


1 user(s) are reading this topic

0 members, 1 guests, 0 anonymous users