


 Sign In
 Create Account
Thanks for the update.


my 1.6 engine rebuild thread

Started by
Alberto
, 01-13-2014 11:35 PM
#21

 Posted 02-12-2014 06:16 PM
Bench Racer
-

- Members
-

- 5,508 posts
Different strokes for different folks : )
- Location:Wauwatosa, WI
- Region:Milwaukee
- Car Year:1990
- Car Number:14
 Back to top
 Report
#22
Posted 02-18-2014 12:39 AM
Alberto
-
- Members
-
- 1,471 posts
Veteran Member
- Location:Mountain View, CA
- Region:SFR
- Car Year:1990
So, I spent the day cleaning engine parts today.
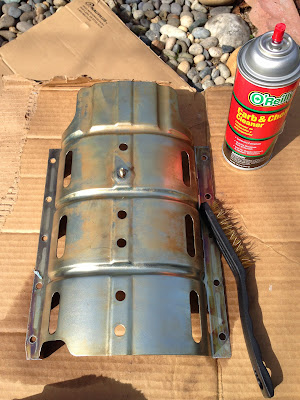
I used bio friendly Mineral Spirits and a nylon brush (like you use in your kitchen) to start off with on the heavily dirty parts like the oil pan and valve cover since I didn't drop those at the machine shop for some reason... The Mineral Spirits did a decent job of dissolving the oil and grease but not great. I hosed off the parts and then wound up trying carb cleaner and a brass brush. That worked alot better although Mineral Spirits did a respectable job when used with a brass brush rather than the nylon brush. Carb cleaner seems to work better overall.
Before:
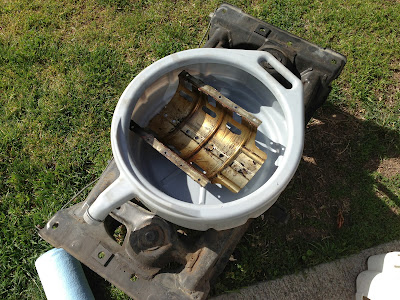
After-ish. Switching to carb cleaner and the brass brush here:
Before:
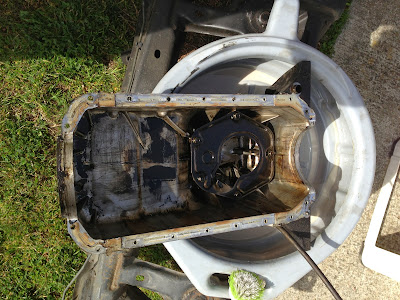
Almost after. Disassembled the pan and starting the clean deep into the pan:

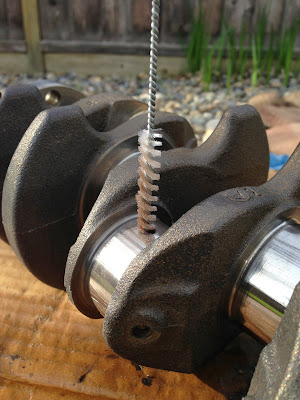
Once I got these dirty parts clean, I started on the 'machine shop clean' crankshaft and block. I decided to use carb cleaner and a set of engine cleaning brushes I bought at Harbor Freight for this. The oil and coolant passages were pretty dirty. I used a nylon brush and carb cleaner to carefully scrub the rough cast iron clean(er) completely avoiding the machined lobes of the crank.
Here is where I stopped taking pics b/c my hands were dripping in carb cleaner. Even though I was wearing thick nitrile gloves, my hands still smell like carb cleaner. Wifey no likey.  Me neither. Frickin smells.
I wiped down the machined surfaces with thin dino motor oil and packed them away in the engine build bags for safe keeping. Hoping to assemble next Sat.
Wish me luck.

#23
Posted 02-18-2014 12:44 AM
Alberto
-
- Members
-
- 1,471 posts
Veteran Member
- Location:Mountain View, CA
- Region:SFR
- Car Year:1990
Almost forgot. I have some questions.
Under the valve cover, there are 2-3 compartments with covers held down by small screws. What are these for? I'm assuming I should pull these off and clean under there also. They are on really tight. Looks like the covers are held in with RTV or silicone type stuff. Not sure if that is original. ..
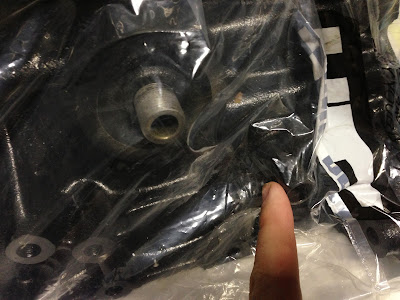
What covers this big 1/2" or 3/4" nipple that is alongside the oil filter?
Thanks.
#24
Posted 02-18-2014 01:25 PM
fotostars
-

- Members
-
- 312 posts
Member
- Location:Norcal
- Car Year:1997
- Car Number:63
Well done! I remember removing, cleaning and re-assembling the compartments on the cover. It may have been RTV, can't recall.
For that nipple you're showing. I don't recall this. I'll have to go look in the garage on that other engine I have on a stand.

#25
Posted 02-18-2014 02:25 PM
Alberto
-
- Members
-
- 1,471 posts
Veteran Member
- Location:Mountain View, CA
- Region:SFR
- Car Year:1990
Thanks Richard.
Adding a 3rd question...
On the back of the engine, I noticed an allen head bolt that appears to thread through something that looks like a reddish rubber plug along the oil channel that runs from the back of the engine, through the oil filter attachment point to the front of the engine. I'm assuming I should remove that and run some brushes through there to clean up that passage.
Is my assumption correct?
Does that thing need to be replaced or can it be reused? If it needs to be replaced, I need to order it ASAP.
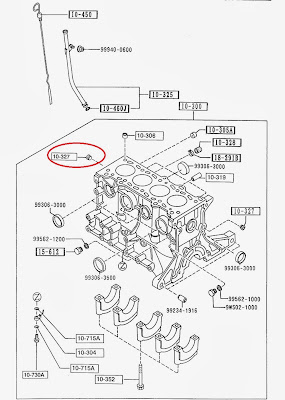
Mazda Motorsports lists this part number for it: 0221-10-327
Thanks.
#26
Posted 02-18-2014 02:35 PM
davew
-

- SMembers
-
- 2,297 posts
Veteran Member
- Location:Beloit, Wi
- Region:Chicago
- Car Year:1999
- Car Number:72
The big hole on the side of the block is leftover from the turbo. Get a new rubber plug from Mazda.
I don't know what you are talking about in the last post
Dave
Dave Wheeler
Advanced Autosports, the nations most complete Spec Miata shop
Author, Spec Miata Constructors Guide, version 1 and 2.0
Building Championship winning cars since 1995
4 time Central Division Spec Miata Champion car builder 2012-2013-2014-2017
Back to Back June Sprints Spec Miata 1-2 finishes 2016 and 2017
5 time June Sprints winner in Mazda's
6 Time Northern Conference Champion Car Builder
2014 SCCA Majors National point Champion car builder
2014 SCCA Runoffs winner, T4 (Bender)
2014 Central Division Champion, ITS (Wheeler)
2013 Thunderhill 25 hour winning crew chief
2007 June Sprints winner, (GT1, Mohrhauser)
Over 200 race wins and counting.
www.advanced-autosports.com
dave@advanced-autosports.com
608-313-1230


#27
Posted 02-18-2014 09:53 PM
dstevens
-
- SMembers
-
- 1,404 posts
Veteran Member
- Location:Vegas
- Region:LVR
I used bio friendly Mineral Spirits and a nylon brush (like you use in your kitchen) to start off with on the heavily dirty parts like the oil pan and valve cover since I didn't drop those at the machine shop for some reason... The Mineral Spirits did a decent job of dissolving the oil and grease but not great. I hosed off the parts and then wound up trying carb cleaner and a brass brush. That worked alot better although Mineral Spirits did a respectable job when used with a brass brush rather than the nylon brush. Carb cleaner seems to work better overall.
For the things I found that Seafoam didn't get right away or need to soak more I use Berryman's Chem Dip. It's not enviro friendly and I don't know if it's available in CA. A nylon brush will be too compliant to to remove most of the gunk and carbon regardless of the solvent and some will eat the brush. You found the hot tip with the HF brush pack. Last time they were on sale I stocked up. The small stainless brushes welding shops sell for hand cleaning TIG prep work well also. Scotchbrite maroon handpads (#7447) work well also and are resistant to most of the solvents and there is also good ol' steel wool.
#28
Posted 02-18-2014 10:47 PM
Alberto
-
- Members
-
- 1,471 posts
Veteran Member
- Location:Mountain View, CA
- Region:SFR
- Car Year:1990
Thanks Dave.
Took a pic of my actual block to help this along. This is the front of the engine. The section I'm curious about is circled in red.

This is what it looks like from the rear of the block. Looks like it is sealed off with some sort of freeze plug.

Thanks in advance.
#29
Posted 02-18-2014 10:54 PM
Alberto
-
- Members
-
- 1,471 posts
Veteran Member
- Location:Mountain View, CA
- Region:SFR
- Car Year:1990
For the things I found that Seafoam didn't get right away or need to soak more I use Berryman's Chem Dip. It's not enviro friendly and I don't know if it's available in CA. A nylon brush will be too compliant to to remove most of the gunk and carbon regardless of the solvent and some will eat the brush. You found the hot tip with the HF brush pack. Last time they were on sale I stocked up. The small stainless brushes welding shops sell for hand cleaning TIG prep work well also. Scotchbrite maroon handpads (#7447) work well also and are resistant to most of the solvents and there is also good ol' steel wool.
Thanks Dstevens.
The carb cleaner worked quite well paired with a brass brush so I won't have to resort to that stuff. We probably don't have that readily available here in CA.
What would you recommend for wiping down the top and bottom of the block and the mains and crank prior to installing the bearings? I want to give them a final wipe down immediately prior to assembly. I'll probably run a brush through the oil channels one more time too.
#30
Posted 02-18-2014 11:17 PM
dstevens
-
- SMembers
-
- 1,404 posts
Veteran Member
- Location:Vegas
- Region:LVR
I use solvent, usually acetone for the final cleaning/wipe down. Gets grease and dust and drys quick. On assembly I use liberal amounts of assembly lube where appropriate, bearings, etc. I use Permatex but there are others.
#31
Posted 02-18-2014 11:38 PM
Alberto
-
- Members
-
- 1,471 posts
Veteran Member
- Location:Mountain View, CA
- Region:SFR
- Car Year:1990
I use solvent, usually acetone for the final cleaning/wipe down. Gets grease and dust and drys quick. On assembly I use liberal amounts of assembly lube where appropriate, bearings, etc. I use Permatex but there are others.
What do you wipe it down with? One of those scotch brite pads, some sort of towel?
Thanks.
#32
Posted 02-19-2014 01:55 AM
Ron Alan
-
- Members
-
- 3,732 posts
Veteran Member
- Location:Northern CA
- Car Year:1995
Lots of brake cleaner...drys in minutes(seconds actually) and gets off any last little residue!
Ron
RAmotorsports
#33
Posted 02-19-2014 02:45 AM
dstevens
-
- SMembers
-
- 1,404 posts
Veteran Member
- Location:Vegas
- Region:LVR
For wipers I use heavy duty Wipall but most anything clean and fiber free will work. HF is having a sale on red shop towels, coupon on their site. Brake clean works as well but it can be spendy. I started getting it in bulk when I was running at the Bullring and it made sense. I could use a couple of cans a weekend.
#34
Posted 02-19-2014 11:49 AM
Alberto
-
- Members
-
- 1,471 posts
Veteran Member
- Location:Mountain View, CA
- Region:SFR
- Car Year:1990
Much thanks fellas.
Anyone have any input on this plug like thing circled in red?
Thanks Dave.
Took a pic of my actual block to help this along. This is the front of the engine. The section I'm curious about is circled in red.
This is what it looks like from the rear of the block. Looks like it is sealed off with some sort of freeze plug.
Thanks in advance.
#35
Posted 02-19-2014 11:53 AM
fotostars
-
- Members
-
- 312 posts
Member
- Location:Norcal
- Car Year:1997
- Car Number:63
I don't have a "bare block" handy but is it not the inlet for the oil out of the oil pump?
#36
Posted 02-19-2014 11:35 PM
Alberto
-
- Members
-
- 1,471 posts
Veteran Member
- Location:Mountain View, CA
- Region:SFR
- Car Year:1990
While this was a lesson I already knew, allow me to share it with the class following along at home.
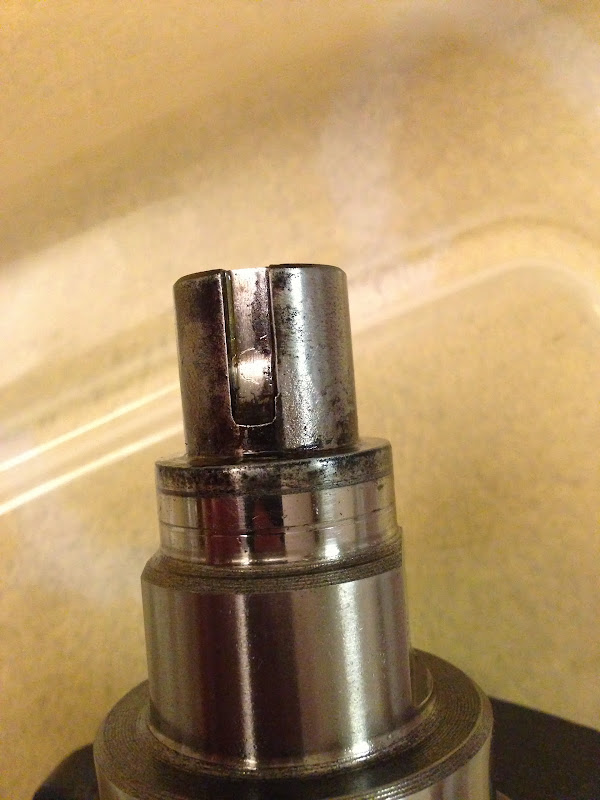
There is a very good reason to take your engine rebuild to a reputable SM engine builder. They will hopefully catch imperfections such as a worn keyway on a 'short nose crank' before you buy a new oil pump, timing belt cog, pulley, pulley bolt and woodruff key...
FML
So the machine shop didn't clean the snout of the crank for some reason. So I hit it w/ carb cleaner and some 600 grit sandpaper to get the gunk off the snout this weekend. I'm now assuming some of that crap was Loctite...
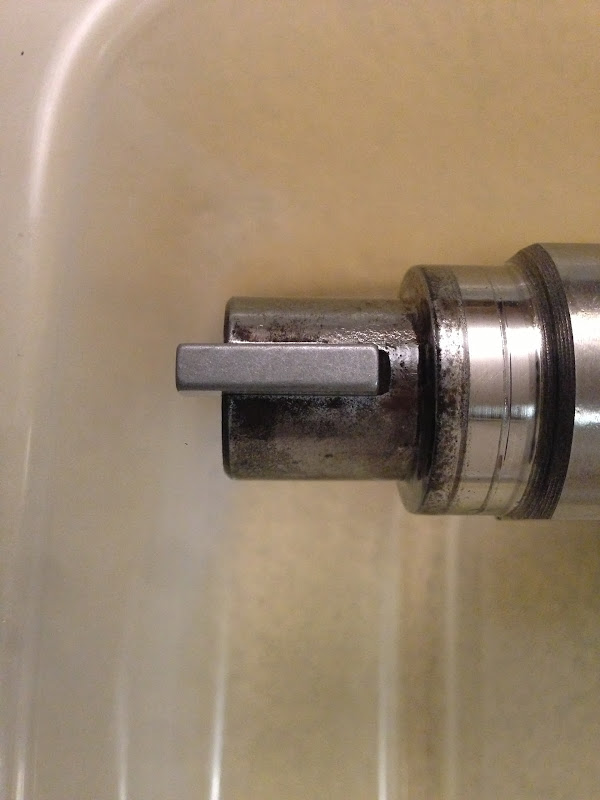
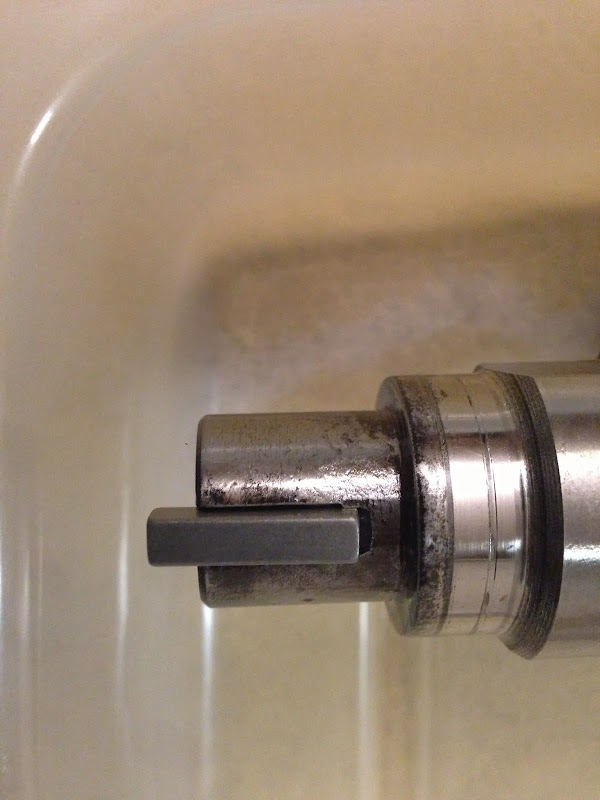
Was looking over the big box o parts that the boys at Mazda Motorsports sent over and decided to fit the woodruff key today to make sure they sent the right one. That's when I noticed this slight imperfection on the keyway. Check the pics.
The woodruff key seems to fit pretty tightly when pushed past the worn area. However, without fitting the timing cog and such, I'm not sure just how much of the key extends past that spot and how tightly all the parts will fit together.
Not sure if this is related or not but I thought something was odd when the big bolt at the front of the crank was only hand tight. It came right off with minimal effort using a normal ratchet. The timing belt had been on there a good 40-60k miles.
Do you guys think I can re-use the crank?
At the section that is widened out, the thickest feeler I can stick in there and bottom out is a .229 mm. It is tight. The .203 mm slides in and bottoms out easily. The rear of the woodruff key does not move. The front can be moved side to side slightly

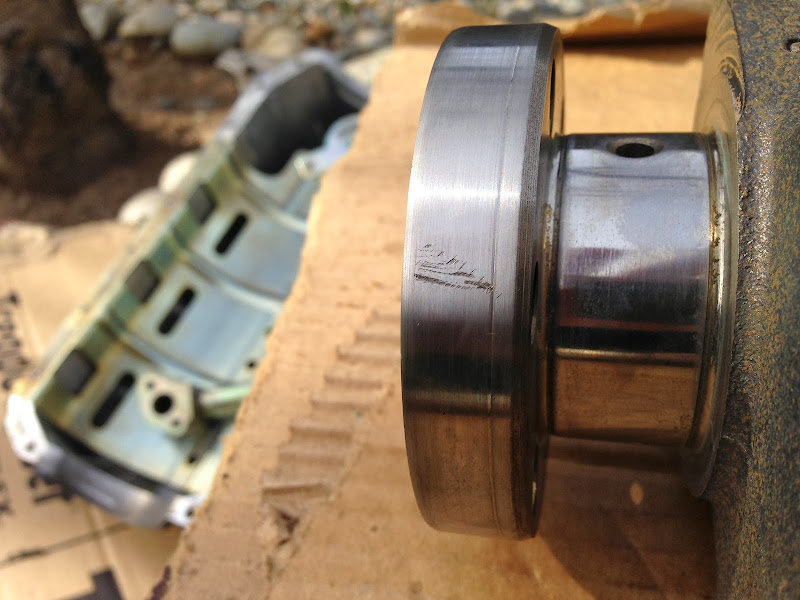
I also discovered this gem at the rear main seal from a 'mechanic' who replaced the rear main seal. This is why I do my own work...
#37
Posted 02-20-2014 06:39 AM
Bench Racer
-
- Members
-
- 5,508 posts
Different strokes for different folks : )
- Location:Wauwatosa, WI
- Region:Milwaukee
- Car Year:1990
- Car Number:14
Thank you for the education. .007/.009 inch clearance. I would not use the crank. Would you be allowed to return the parts, find a crank and get the long nose parts.

#38
Posted 02-20-2014 06:10 PM
fotostars
-
- Members
-
- 312 posts
Member
- Location:Norcal
- Car Year:1997
- Car Number:63
Not all is lost. My crank was shot because I melted a rod bearing and still rebuilt the engine.
I just gave Ron a call and he found me a used bottom-end from which I could use the crank. Price was reasonable too...
Good luck!
#39
Posted 02-20-2014 07:53 PM
Alberto
-
- Members
-
- 1,471 posts
Veteran Member
- Location:Mountain View, CA
- Region:SFR
- Car Year:1990
I think I'm moving on to Plan B - scavenge the long nose crank from the 91 motor that is currently in the car. Hopefully it is usable. Yanking the motor on Sat.
I spoke with Mazda Motorsports earlier and they'll let me return the SNC parts.
The best laid plans of mice and men and all that...
#40
Posted 02-23-2014 09:10 PM
Alberto
-
- Members
-
- 1,471 posts
Veteran Member
- Location:Mountain View, CA
- Region:SFR
- Car Year:1990
So Austin, Brandon, JohnnyD and my recently transplanted NY'er family friend Steve dropped in on Sat and we yanked the 91, big nose crank motor out of the car. Flipped it upside down on the garage floor and removed the crank out. Crank looks to be in great shape. Cleaned it up with carb cleaner today. Contemplating whether to take it to the machine shop to clean or if carb cleaner is gonna be good.
Hoping to re-assemble next week.
- Johnny D likes this

0 user(s) are reading this topic
0 members, 0 guests, 0 anonymous users

